Android 概述 Android 系统架构 Android大致可以分为四层架构:Linux内核层、系统运行库层、应用框架层、应用层
Linux 内核层 Android系统是基于Linux内核的,这一层为Android设备的各种硬件提供了底层的驱动
系统运行库层 通过一些C/C++库为Android系统提供了主要的特性支持,如SQLite提供了数据库的支持, Webkit库提供了浏览器内核的支持
应用框架层 构建应用程序可能用到的各种API
应用层 安装在手机上的应用程序属于这一层
Android 应用开发特色 四大组件 Android 系统的四大组件分别是 Activity、 Service、 BroadcastReceiver、 ContentProvider
Activity是所有Android应用程序的门面,凡是在应用中你看得到的东西 ,都是放在Activity中
Service会在后台继续运行,即使用户退出了应用,Service仍然是可以继续运行的
BroadcastReceiver允许你的应用接受来自各处的广播信息 ,比如电话,短信等,当然你的应用也可以向外发出广播信息
ContentProvider则是为应用程序之间共享数据提供了可能,比如想通过读取系统通讯录中的联系人,就需要通过ContentProvider来实现
丰富的系统控件 Android系统为开发者提供了丰富的系统控件,当然也可以定制属于自己的控件
SQLite数据库 Android系统还自带了这种轻量级、运算速度极快嵌入式关系型数据库 ,不仅支持标准的SQL语法,还可以通过Android封装好的API进行操作,让存储和读取数据变得非常方便。
强大的多媒体 Android 系统还提供了丰富的多媒体服务,如音乐、视频、录音、拍照等
Android 应用项目的开发流程
在Android Studio 中生成Android应用项目框架
编写和修改Java源程序
编写或修改 xml 源程序
调用模拟器运行应用程序
Android应用程序架构分析
探究Activity Activity是一种可以包含用户界面的组件,主要用于和用户进行交互
创建Activity步骤
新建Activity
创建和加载布局
1
2
3
4
5
6
7
8
9
10
11
12
13
14
15
16
17
18
19
20
21
22
23
24
25
26
27
<?xml version="1.0" encoding="utf-8"?> <LinearLayout xmlns:android ="http://schemas.android.com/apk/res/android" android:layout_width ="match_parent" android:layout_height ="wrap_content" android:orientation ="vertical" > <TextView android:id="@+id/textView" android:layout_width="wrap_content" android:layout_height="wrap_content" android:layout_weight="1" android:text="@string/second"> </TextView > <Button android:id="@+id/btn2" android:layout_width="wrap_content" android:layout_height="wrap_content" android:layout_weight="1" android:text="关闭" android:onClick="closeActivity" /> </LinearLayout >
并在SecondActity.java的onCreate()中调用setContentView方法给当前的Activity加载一个布局
1
2
3
4
5
6
@Override protected void onCreate (Bundle savedInstanceState) super .onCreate(savedInstanceState); setContentView(R.layout.activity_second); Log.e("activityState" , "SecondActivity_onCreate" ); }
在AndroidManifest文件中进行注册
1
2
3
4
5
6
7
8
9
10
11
12
13
<activity android:name=".SecondActivity" android:exported="true"> <intent-filter > <action android:name ="action.nextActivity" /> <category android:name ="android.intent.category.DEFAULT" /> </intent-filter > <meta-data android:name="android.app.lib_name" android:value="" /> </activity >
销毁一个Activity 只需要调用finish方法就可以了
1
2
3
4
public void closeActivity (View view) Log.e("activityState" , "SecondActivity_finish" ); this .finish(); }
使用Intent在Activity之间进行穿梭
Intent 是 Android 程序中各组件之间进行交互的一种重要方式,它不仅可以指明当前组件想要执行的动作,还可以在不同组件之间传递数据。Intent一般可用于启动Activity、启动 Service 、发送广播等场景。
Intent 可以分为 显式Intent和 隐式Intent
显式Intent 一共有三种方式
class跳转 1 2 Intent intent = new Intent(this , SecondActivity.class); this .startActivity(intent);
包名.类名 1 2 3 Intent intent = new Intent(); intent.setClassName(this , "com.sineagle.mainactivity.SecondActivity" ); startActivity(intent);
ComponentName 1 2 3 4 Intent intent = new Intent(); ComponentName cname = new ComponentName(this , SecondActivity.class); intent.setComponent(cname); startActivity(intent);
隐式Intent
相比于显式Intent,隐式Intent则含蓄了很多,它并不明确指出想要启动哪个 Activity, 而是指定了一系列更为抽象的 action 和 category等信息, 然后交由系统去分析这个Intent, 并帮我们找出合适的 Activity启动
我们看一下AndroidManifest.xml 中的过滤器
1 2 3 4 5 6 7 8 9 10 11 12 13 <activity android:name=".SecondActivity" android:exported="true"> <intent-filter > <action android:name ="action.nextActivity" /> <category android:name ="android.intent.category.DEFAULT" /> </intent-filter > <meta-data android:name="android.app.lib_name" android:value="" /> </activity >
其中在<intent-filter> 标签中的 <category android:name=”” > 中,
android.intent.action.MAIN
android.intent.category.LAUNCHER
在<action android:name=”action.nextActivity”/>
只有<action>和<category> 中的内容同时匹配 Intent中指定的 action和 category 时,这个Activity才能响应该 Intent
1
2
3
Intent intent = new Intent(); intent.setAction("action.nextActivity" ); startActivity(intent);
或者这样写
1 2 Intent intent = new Intent("action.nextActivity" ); startActivity(intent);
Activity的生命周期
Android是使用任务(task)来管理 Activity的, 一个任务就是一组存放在栈里的 Activity 的集合,这个栈也被称作返回栈,默认情况下,每当我们启动一个新的 Activity,它就会在返回栈中入栈,并处于栈顶的位置。当我们按下Back键或调用 finish()方法去销毁一个Activity 时,处于栈顶的 Activity 就会出栈,前一个入栈的 Activity 就会重新处于栈顶的位置。系统总显示处于栈顶的Activity给用户。
Activity的状态
运行状态:位于返回栈栈顶
暂停状态:不再位于栈顶位置,但仍然可见
停止状态:不再处于栈顶位置,并且完全不可见
销毁状态:从返回栈中移除就变成销毁状态
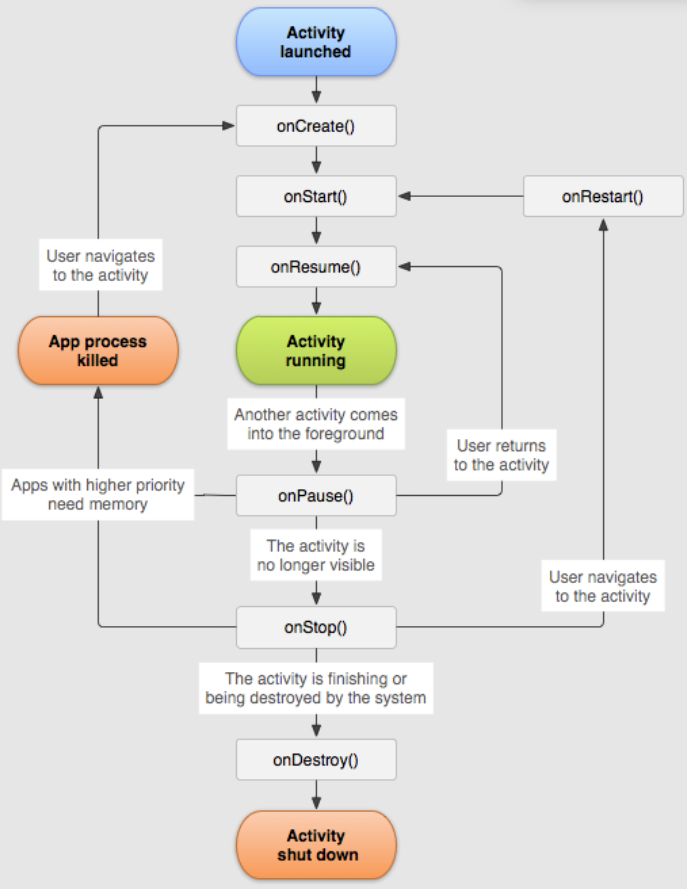
Activity的生存期 Activity类中定义了七个回调方法,覆盖了 Activity 生命周期的每个环节
onCreate() : 在Activity第一次被创建的时候调用,完成Activity的初始化操作 ,如加载布局,绑定事件
onStart() : 该方法在Activity由不可见变为可见 的时候调用。
onResume() : 在 Activity 准备好和用户进行交互的时候调用。此时的Activity一定位于返回栈的栈顶 , 并且处于运行状态
onPause() : 这个方法在系统准备去启动或者去恢复另一个Activity的时候调用 ,通常会将一些消耗CPU的资源释放掉,以及保存一些关键数据 ,这个方法的执行速度一定要快,不然会影响到新的栈顶 Activity的使用
onStop() : 这个方法在Activity完全不可见的时候调用 (处于停止状态)。它和 onPause()的区别主要在于,如果启动的新Activity是一个对话框形式的Activity, 那么onPause()方法会得到执行,而onStop方法并不会执行。
onDestory() : 在Activity 被销毁之前 调用,之后Activity的状态将变为销毁状态。
onRestart() : 在Activity由停止状态变为运行状态之前 调用,也就是Activity重新启动了。
以上七个方法除了 onRestart()方法,其它都是两两相对的,从而可以将Activity分为三种生存期:
完整生存期:Activity在 onCreate()方法和 onDestory()方法之间所经历的就是完整生存期。
可见生存期: Activity 在 onStart()方法和 onStop()方法之间所经历的就是可见生存期。
前台生存期: Activity 在 onResume() 方法和 onPause() 方法之间所经历的就是前台生存期。
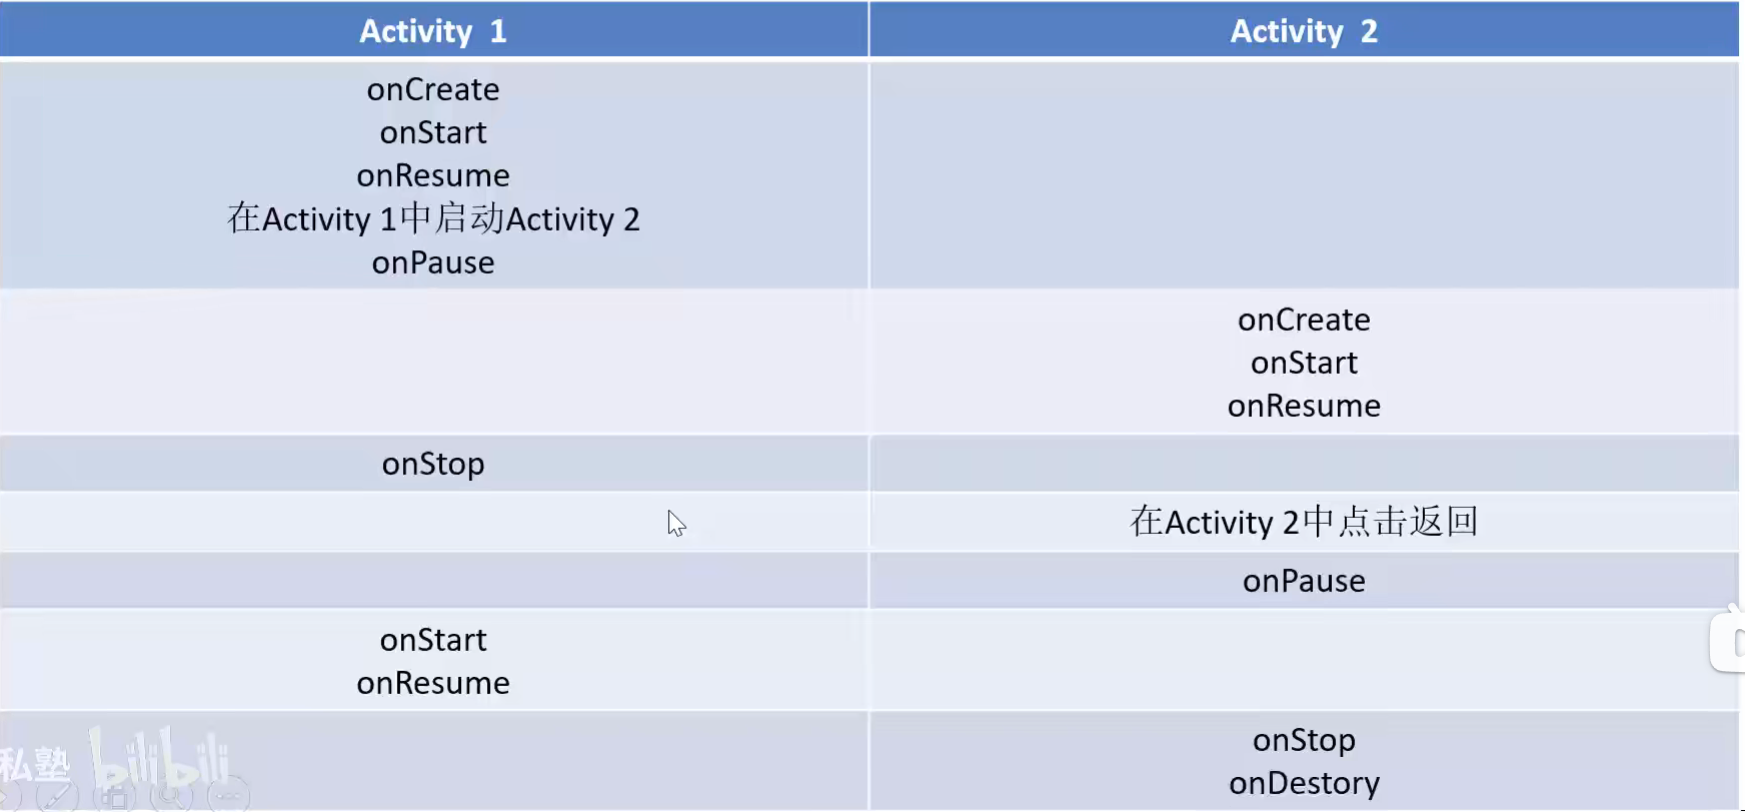
两个Activity的生命周期情况
基本布局 Android 界面设计 被称为布局
Android 中常见的布局包括:
相对布局(RelativeLayout)
线性布局(LinearLayout)
表格布局(TableLayout)
网格布局(GridLayout)
帧布局(FrameLayout)
UI设计相关的几个概念 View
View在Android中可以理解为视图。它占据屏幕上的一块矩形区域,负责提供组件绘制和事件处理方法
View类 是所有 widgets组件的基类View类位于 android.view包中; View类的子类一般都位于 android.widget包中
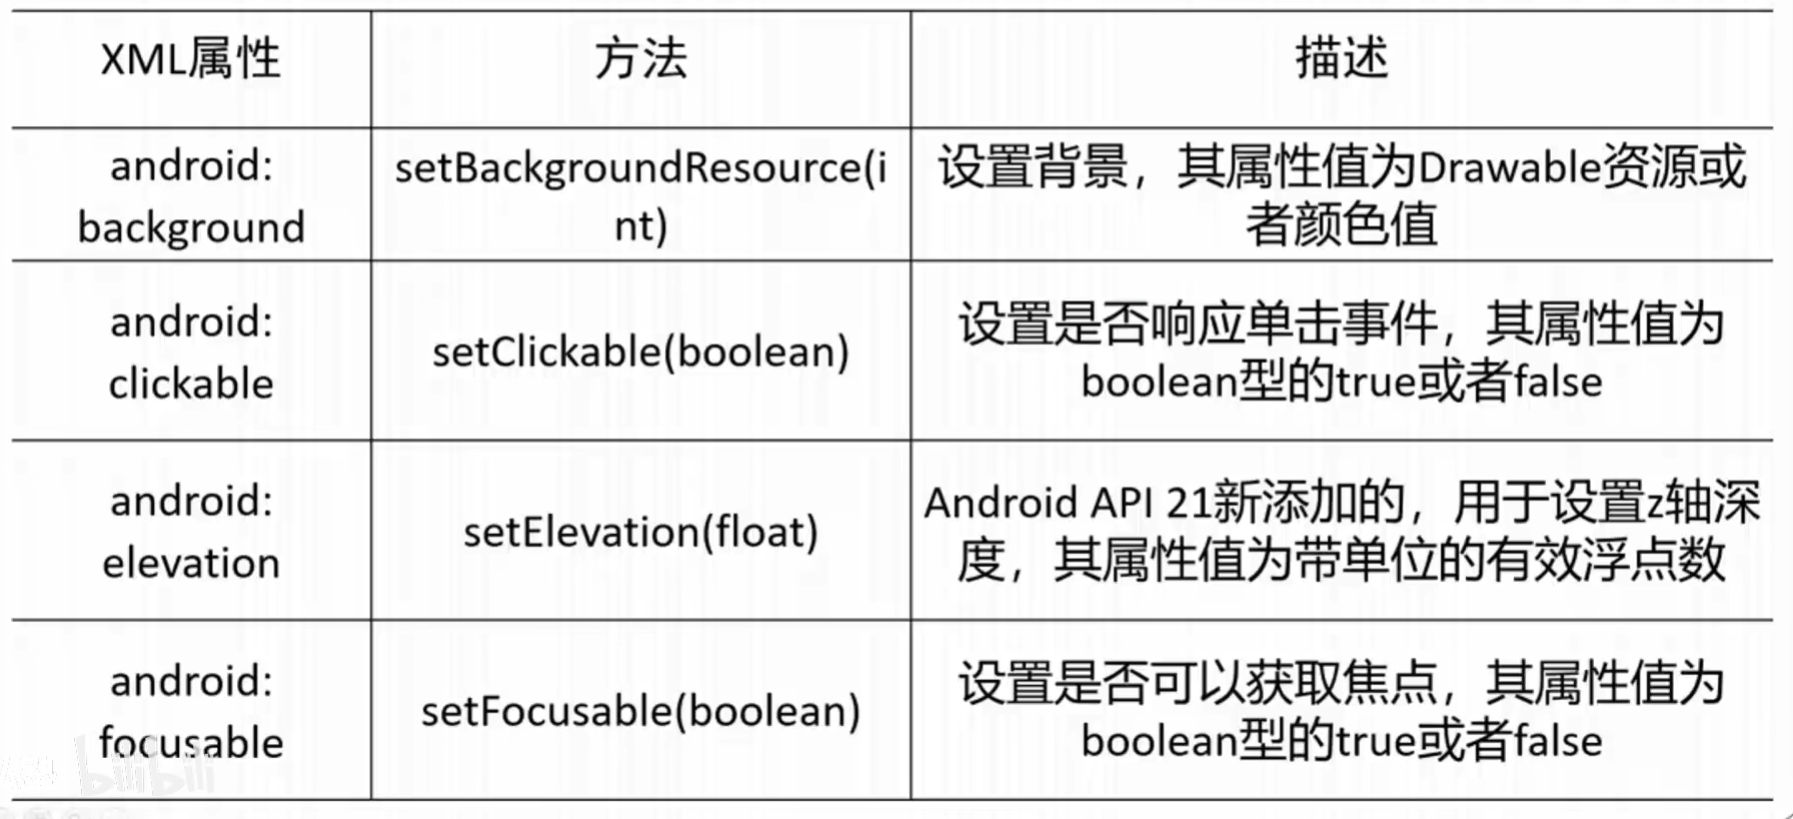
View类支持的常用XML属性及其对应的方法:
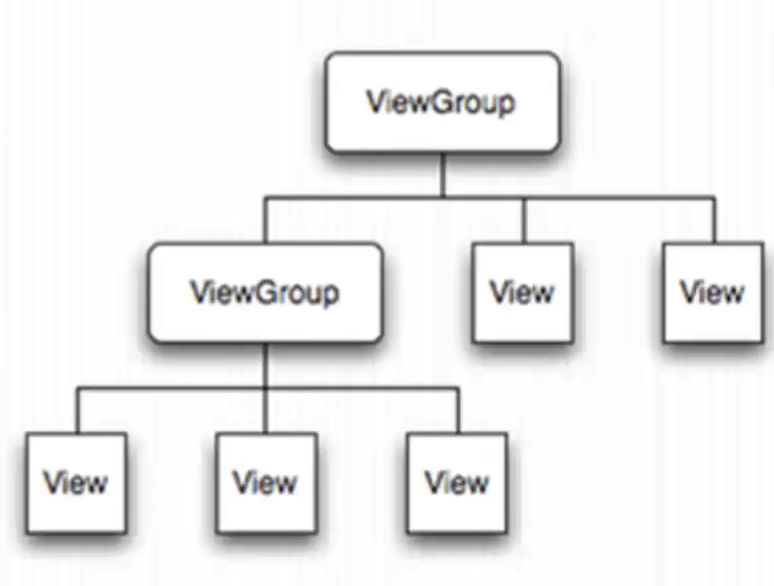
ViewGroup
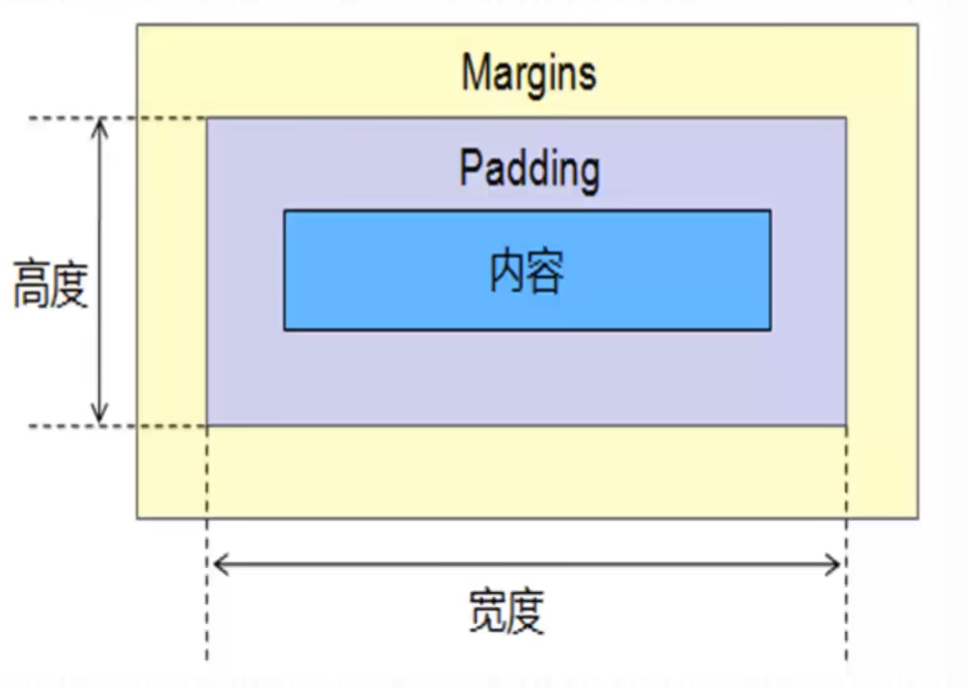
Padding和Margins
Padding : 在View的顶部、底部、左侧和右侧的填充像素,也称作内边距 。
它设置的是内容与View边缘的距离。Padding将占据View的宽度和高度。设置指定的内边距后,视图内容将偏离View边缘指定的距离
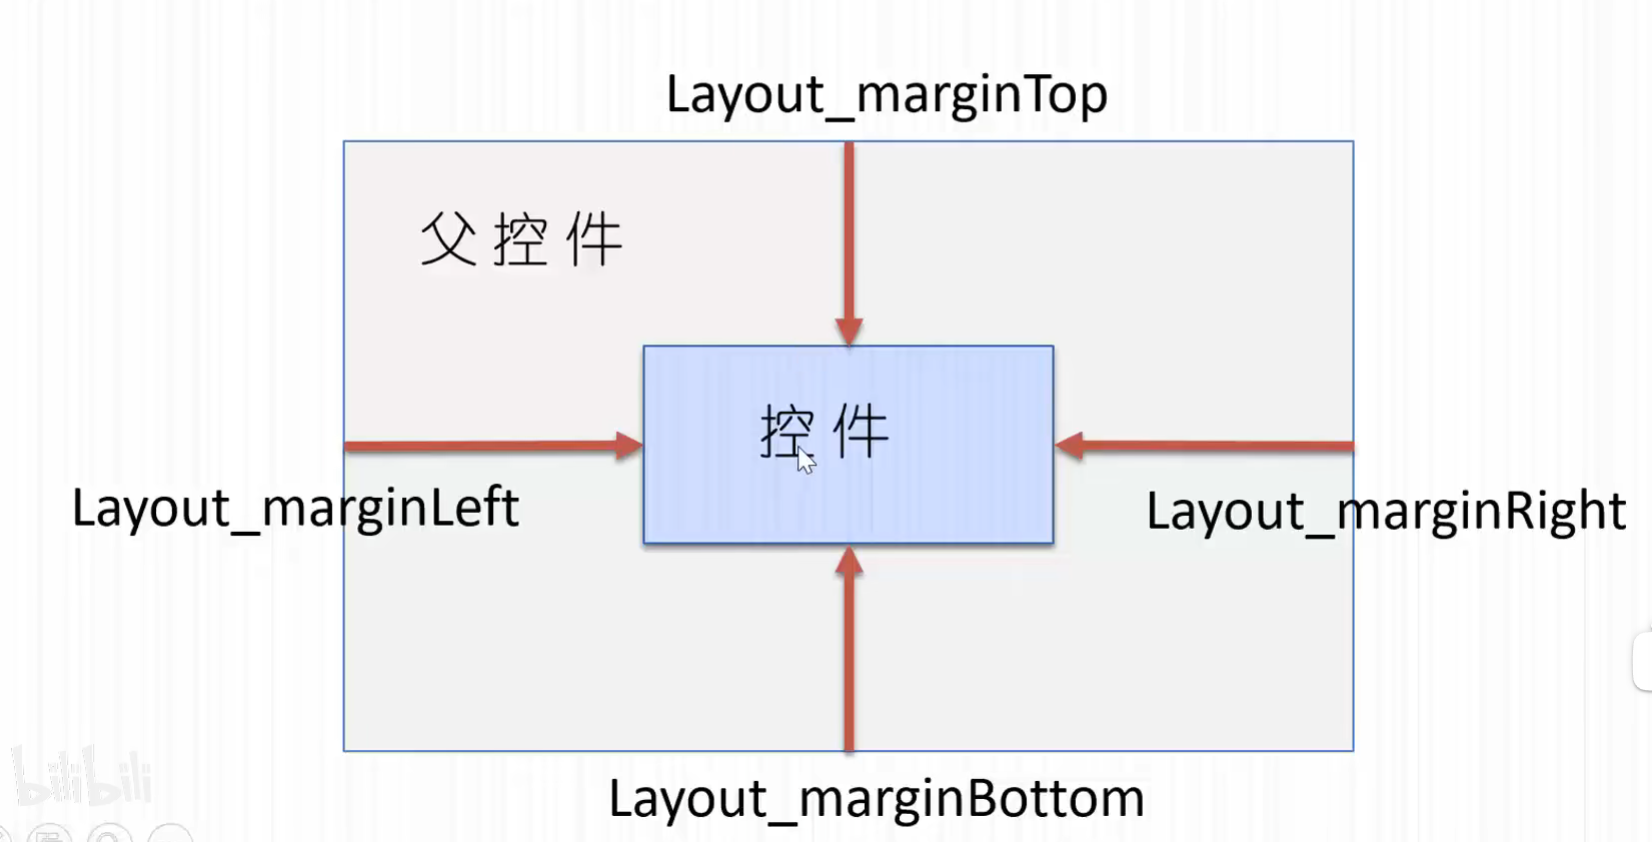
Margins : 组件的顶部、底部、左侧、右侧的空白区域,称为外边距 。它设置的是组件与其父容器的距离。Margins不占据组件的宽度和高度。为组件设置外边距后,该组件将远离父容器指定的距离,如果还有相邻组件,那么也将远离相邻组件指定距离
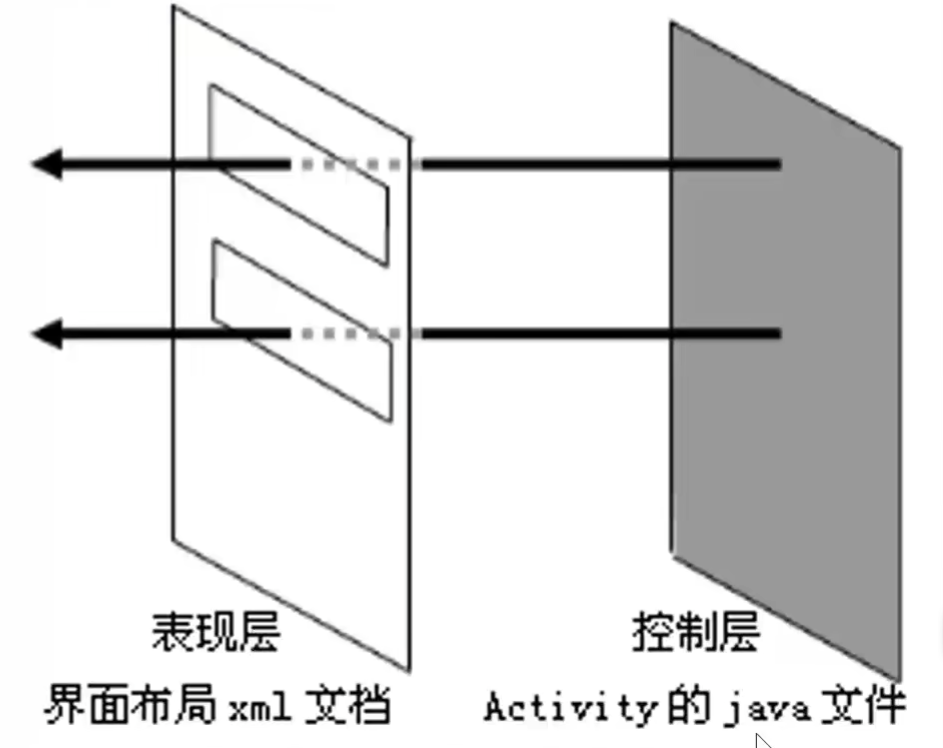
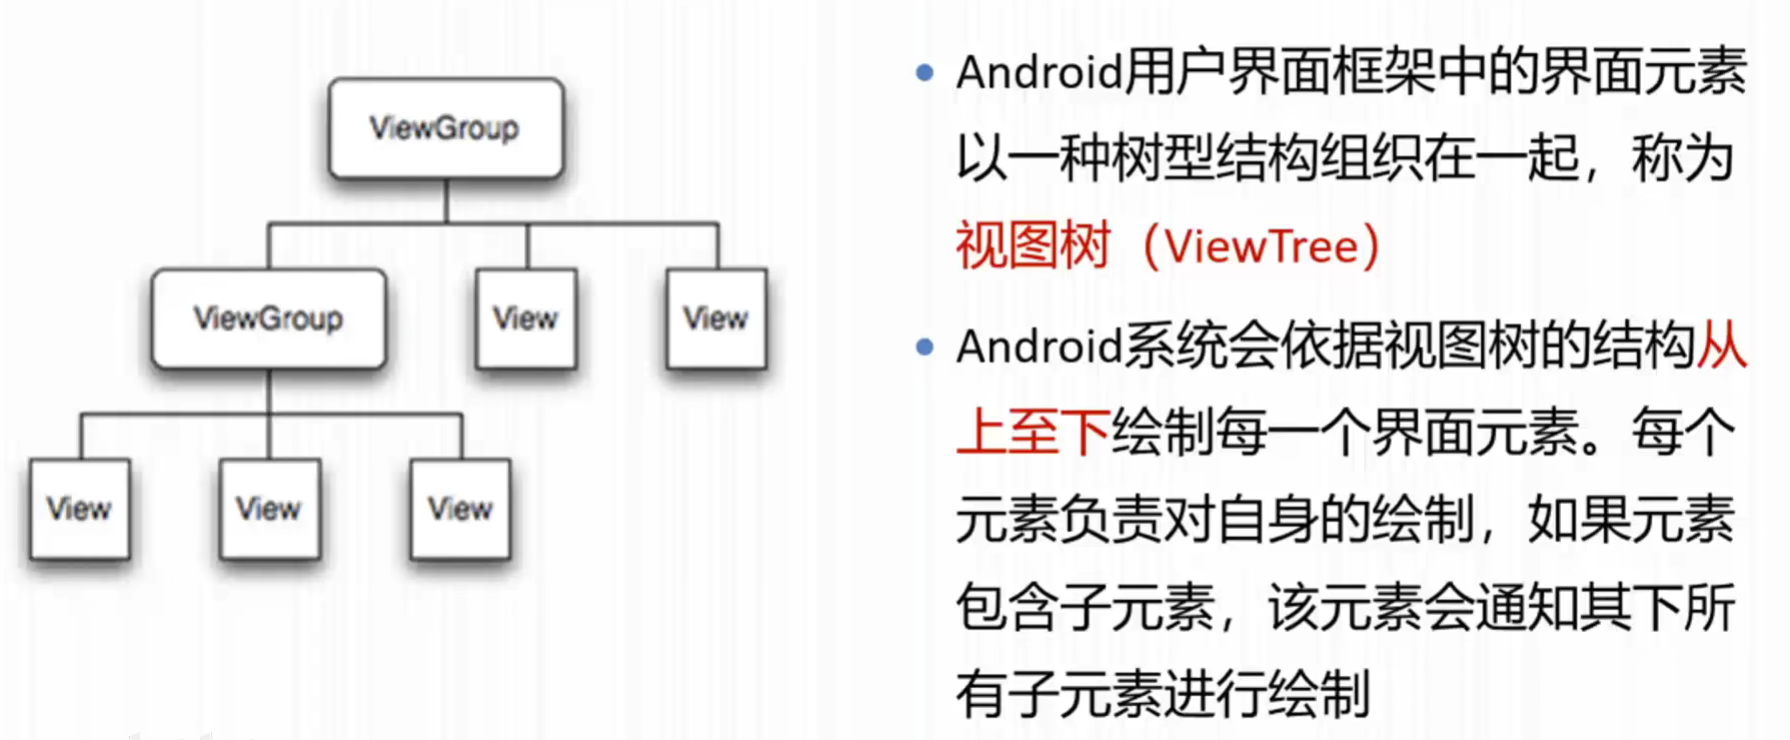
Android用户界面框架
Activity代表的是显示给用户的窗口或屏幕
Android中定义的Activity使用一个view和viewgroup的树状节点
要显示一个用户界面就需要给Activity分配一个View或者布局
界面布局:
界面布局Layout是用户界面结构的描述,定义了界面中的所有元素、结构和相互关系
声明Android程序界面布局有两种方法
使用xml文件描述界面布局
在程序运行时动态添加或修改界面布局
用户既可以独立使用任何一种声明界面布局的方式,也可以同时使用两种方式
布局组件Layout ViewGroup是一个抽象类,也是其它容器类的基类。它的一些实现类有:
线性布局(LinearLayout)
帧布局(FrameLayout)
相对布局(RelativeLayout)
表格布局(TableLayout)
绝对布局(AbsoluteLayout)
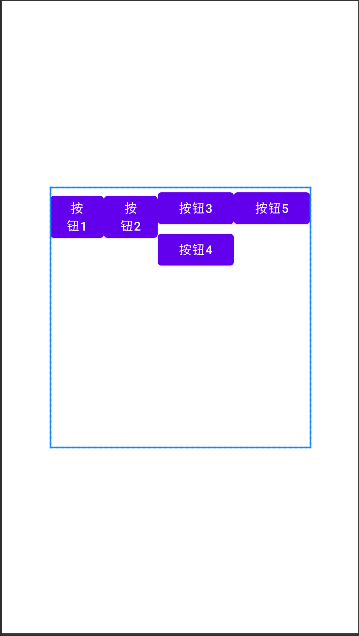
线性布局(LinearLayout) 1 2 3 4 5 6 7 8 9 10 11 12 13 14 15 16 17 18 19 20 21 22 23 24 25 26 27 28 29 30 31 32 33 34 35 36 37 38 39 40 41 42 43 44 45 46 <?xml version="1.0" encoding="utf-8"?> <LinearLayout android:layout_width ="300dp" android:layout_height ="300dp" android:orientation ="horizontal" android:layout_gravity ="center" android:gravity ="center|top" xmlns:android ="http://schemas.android.com/apk/res/android" > <Button android:layout_width="wrap_content" android:layout_height="wrap_content" android:text="按钮1" android:layout_weight="1" /> <Button android:layout_width="wrap_content" android:layout_height="wrap_content" android:text="按钮2" android:layout_weight="1" /> <LinearLayout android:layout_width ="wrap_content" android:layout_height ="wrap_content" android:orientation ="vertical" xmlns:android ="http://schemas.android.com/apk/res/android" > <Button android:layout_width="wrap_content" android:layout_height="wrap_content" android:text="按钮3" android:layout_weight="1" /> <Button android:layout_width="wrap_content" android:layout_height="wrap_content" android:text="按钮4" /> </LinearLayout > <Button android:layout_width="wrap_content" android:layout_height="wrap_content" android:text="按钮5" /> </LinearLayout >
显示效果如下:
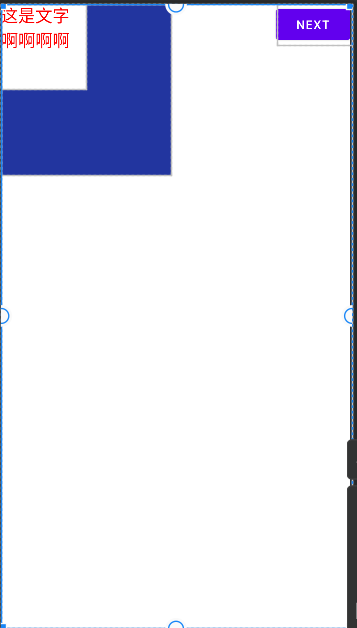
帧布局(FrameLayout) 1 2 3 4 5 6 7 8 9 10 11 12 13 14 15 16 17 18 19 20 21 22 23 24 25 26 27 28 29 30 31 32 33 34 35 36 37 38 39 40 41 42 43 <?xml version="1.0" encoding="utf-8"?> <androidx.constraintlayout.widget.ConstraintLayout xmlns:android ="http://schemas.android.com/apk/res/android" xmlns:app ="http://schemas.android.com/apk/res-auto" xmlns:tools ="http://schemas.android.com/tools" android:layout_width ="match_parent" android:layout_height ="match_parent" tools:context =".FrameLayoutActivity" > <FrameLayout android:id="@+id/myframe" android:layout_width="match_parent" android:layout_height="match_parent" tools:layout_editor_absoluteX="1dp" tools:layout_editor_absoluteY="1dp"> <TextView android:layout_width="200dp" android:layout_height="200dp" android:background="#22359F" /> <TextView android:layout_width="100dp" android:layout_height="100dp" android:background="#fff" android:text="这是文字啊啊啊啊" android:textColor="#f00" android:textSize="20sp" /> <Button android:layout_width="wrap_content" android:layout_height="wrap_content" android:text="next" android:layout_gravity="right" > </Button > </FrameLayout > </androidx.constraintlayout.widget.ConstraintLayout >
相对布局(RelativeLayout)
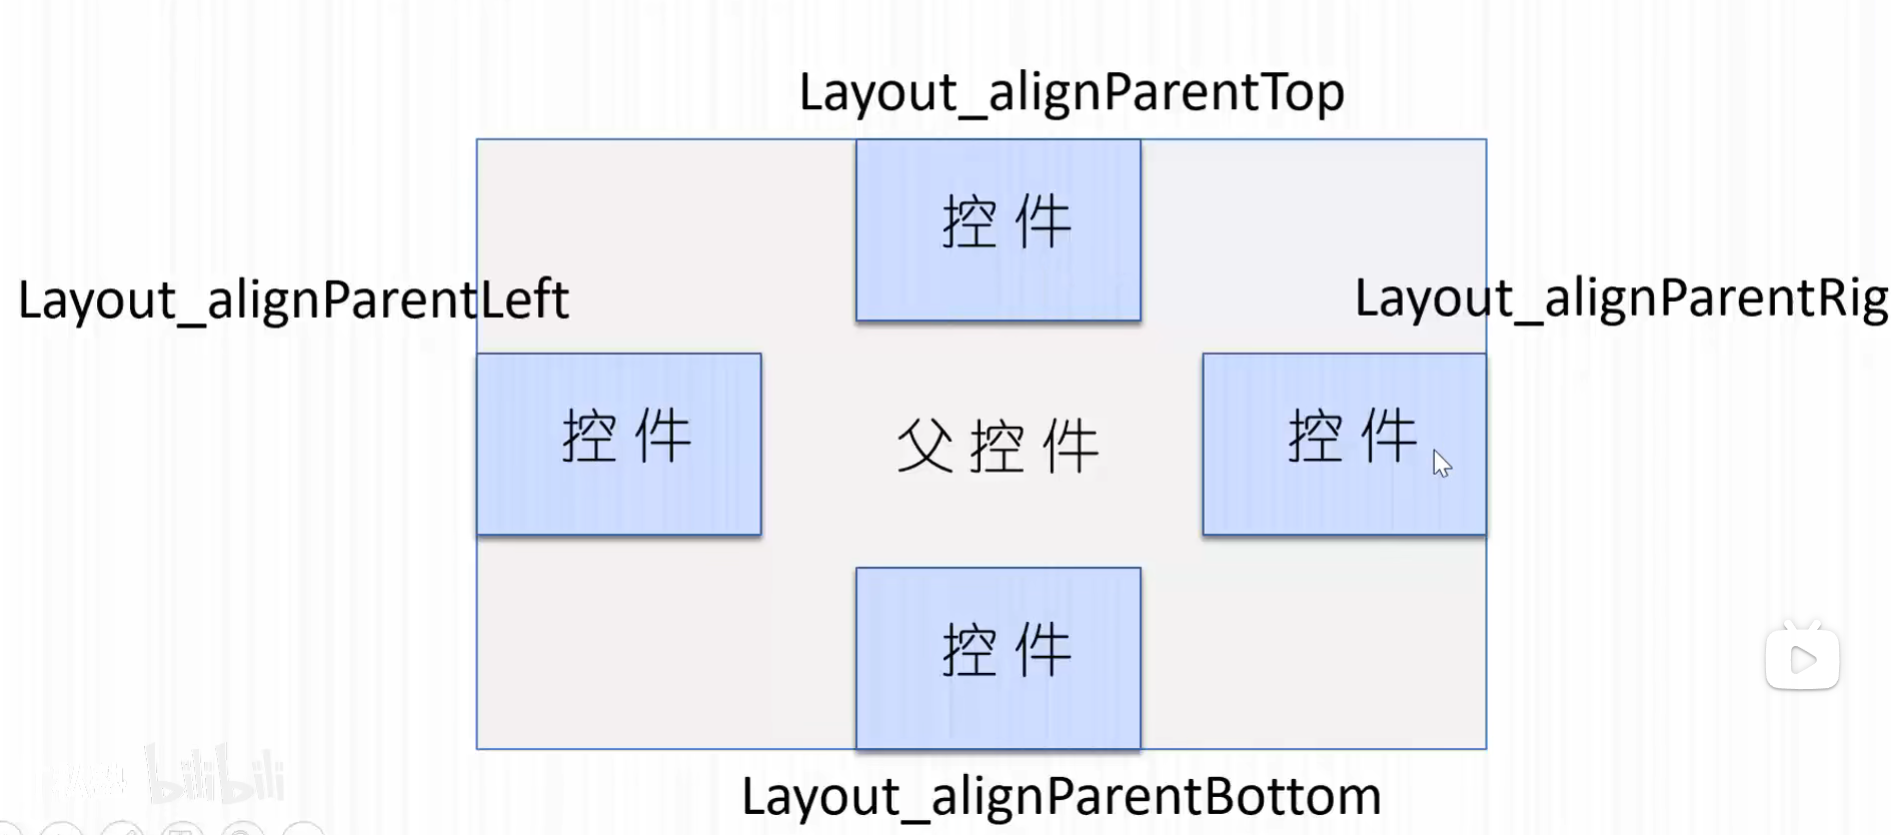
相对父容器布局
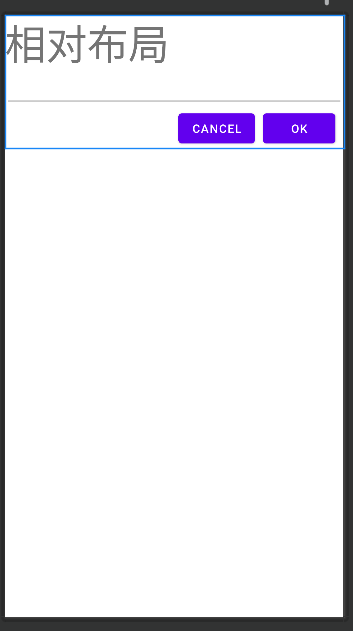
1 2 3 4 5 6 7 8 9 10 11 12 13 14 15 16 17 18 19 20 21 22 23 24 25 26 27 28 29 30 31 32 33 34 35 36 37 38 39 40 41 42 43 44 <?xml version="1.0" encoding="utf-8"?> <RelativeLayout android:layout_height="wrap_content" android:layout_width="wrap_content" xmlns:android="http://schemas.android.com/apk/res/android"> <TextView android:id="@+id/label" android:layout_width="match_parent" android:layout_height="wrap_content" android:text="相对布局" android:textSize="50sp" ></TextView > <EditText android:id="@+id/et1" android:layout_width="match_parent" android:layout_height="wrap_content" android:layout_below="@id/label" > </EditText > <Button android:id="@+id/ok" android:layout_width="wrap_content" android:layout_height="wrap_content" android:layout_below="@id/et1" android:layout_alignParentRight="true" android:layout_marginTop="1dp" android:layout_marginRight="10dp" android:text="OK" ></Button > <Button android:id="@+id/cancel" android:layout_width="wrap_content" android:layout_height="wrap_content" android:layout_below="@id/et1" android:layout_toLeftOf="@id/ok" android:layout_marginRight="10dp" android:layout_alignTop="@id/ok" android:text="cancel"></Button > </RelativeLayout >
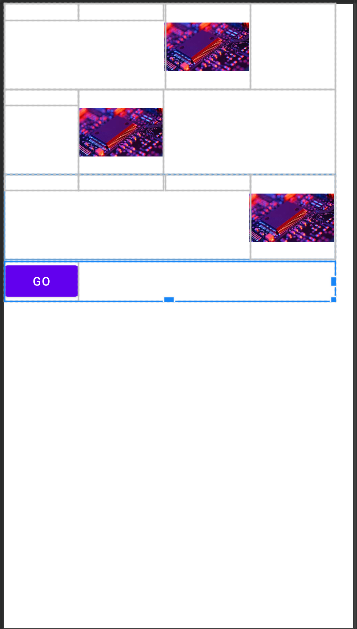
表格布局(TableLayout)
android:shrinkColumns=”1,2” : 如果这一行满了,将下标1,2处元素进行压缩
android:stretchColumns=”1” : 拉伸第1个元素
android:collapseColumns=”2” : 隐藏第2个元素
1 2 3 4 5 6 7 8 9 10 11 12 13 14 15 16 17 18 19 20 21 22 23 24 25 26 27 28 29 30 31 32 33 34 35 36 37 38 39 40 41 42 43 44 45 46 47 48 49 50 51 52 53 54 55 56 57 58 59 60 61 62 63 64 65 66 67 68 69 70 71 72 73 74 75 76 <?xml version="1.0" encoding="utf-8"?> <TableLayout android:layout_height ="wrap_content" android:layout_width ="wrap_content" xmlns:android ="http://schemas.android.com/apk/res/android" > <TableRow > <TextView android:layout_width ="wrap_content" android:layout_height ="wrap_content" android:text ="" > </TextView > <TextView android:layout_width ="wrap_content" android:layout_height ="wrap_content" android:text ="" > </TextView > <ImageView android:layout_height ="100dp" android:layout_width ="100dp" android:src ="@drawable/xinpian1" > </ImageView > </TableRow > <TableRow > <TextView android:layout_width ="wrap_content" android:layout_height ="wrap_content" android:text ="" > </TextView > <ImageView android:layout_height ="100dp" android:layout_width ="100dp" android:src ="@drawable/xinpian1" > </ImageView > </TableRow > <TableRow > <TextView android:layout_width ="wrap_content" android:layout_height ="wrap_content" android:text ="" > </TextView > <TextView android:layout_width ="wrap_content" android:layout_height ="wrap_content" android:text ="" > </TextView > <TextView android:layout_width ="wrap_content" android:layout_height ="wrap_content" android:text ="" > </TextView > <ImageView android:layout_height ="100dp" android:layout_width ="100dp" android:src ="@drawable/xinpian1" > </ImageView > </TableRow > <TableRow > <Button android:layout_width ="wrap_content" android:layout_height ="wrap_content" android:text ="Go" > </Button > </TableRow > </TableLayout >
网格布局(GridLayout) 1 2 3 4 5 6 7 8 9 10 11 12 13 14 15 16 17 18 19 20 21 22 23 24 25 26 27 28 29 30 31 32 33 34 <?xml version="1.0" encoding="utf-8"?> <GridLayout android:layout_height="wrap_content" android:layout_width="wrap_content" android:rowCount="6" android:columnCount="4" xmlns:android="http://schemas.android.com/apk/res/android"> <TextView android:layout_height="wrap_content" android:layout_width="wrap_content" android:textSize="50sp" android:layout_columnSpan="4" > </TextView > <Button android:text ="清除" android:layout_width ="wrap_content" android:layout_height ="wrap_content" android:layout_rowSpan ="2" android:layout_column ="2" > </Button > <Button android:text ="0" android:textSize ="26sp" > </Button > <Button android:text ="0" android:textSize ="26sp" > </Button > <Button android:text ="0" android:textSize ="26sp" > </Button > <Button android:text ="0" android:textSize ="26sp" > </Button > <Button android:text ="0" android:textSize ="26sp" > </Button > <Button android:text ="0" android:textSize ="26sp" > </Button > <Button android:text ="0" android:textSize ="26sp" > </Button > <Button android:text ="0" android:textSize ="26sp" > </Button > <Button android:text ="0" android:textSize ="26sp" > </Button > <Button android:text ="0" android:textSize ="26sp" > </Button > <Button android:text ="0" android:textSize ="26sp" > </Button > <Button android:text ="0" android:textSize ="26sp" > </Button > </GridLayout >
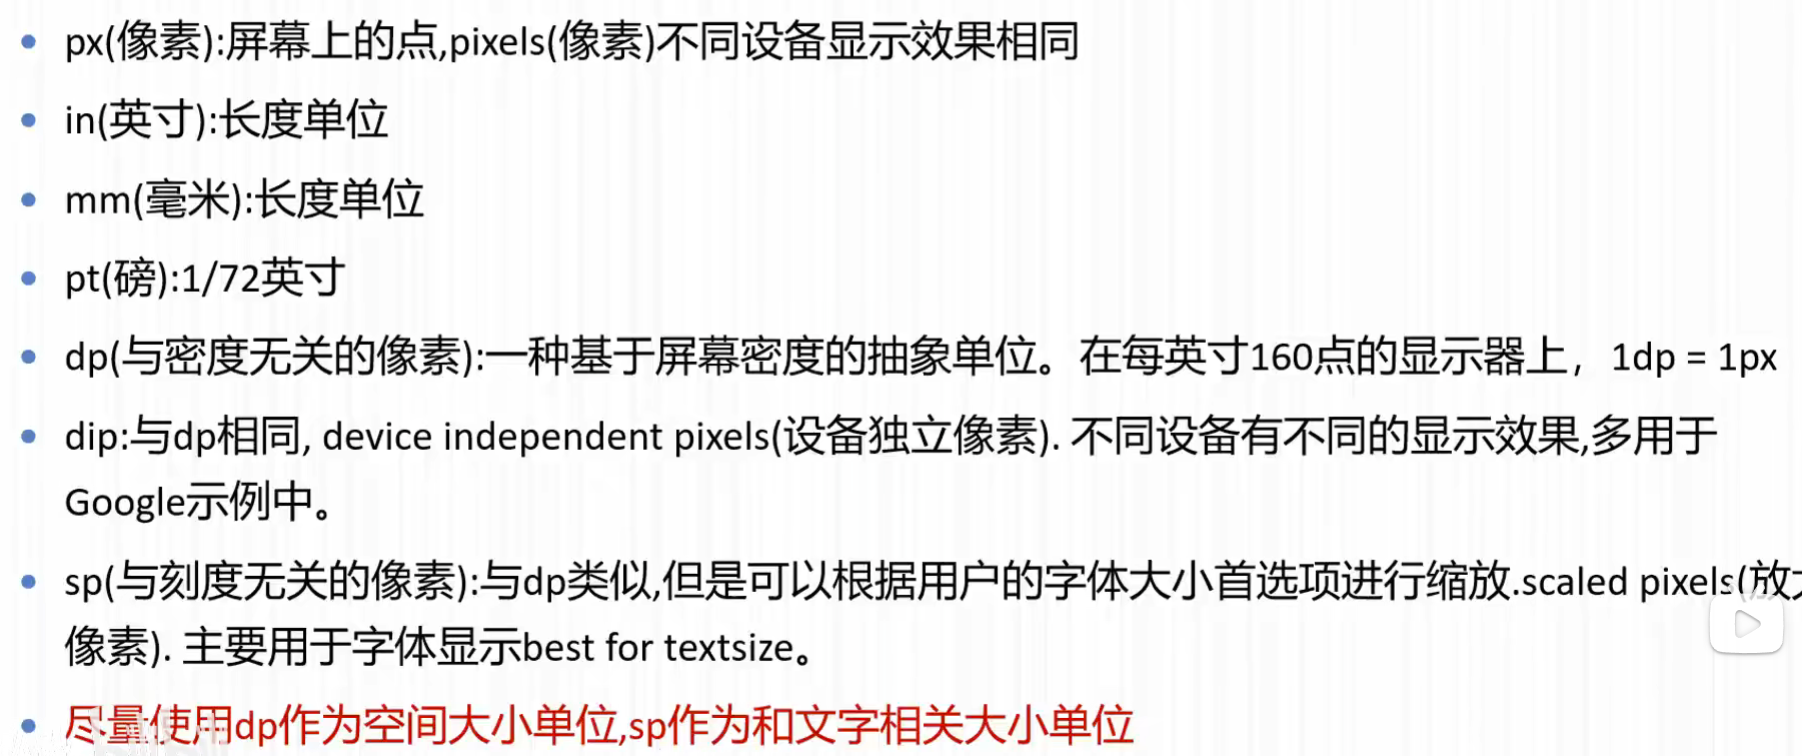
Android 中的单位
引入外部布局 通过inclue标签进行引入
1 2 3 4 5 6 7 8 9 10 11 12 13 14 15 16 17 18 19 20 <?xml version="1.0" encoding="utf-8"?> <LinearLayout xmlns:android ="http://schemas.android.com/apk/res/android" xmlns:app ="http://schemas.android.com/apk/res-auto" xmlns:tools ="http://schemas.android.com/tools" android:layout_width ="match_parent" android:layout_height ="match_parent" tools:context =".MainActivity" android:orientation ="vertical" > <include layout ="@layout/layout_text" > </include > <Button android:layout_height="wrap_content" android:layout_width="wrap_content" android:text="OK" > </Button > </LinearLayout >
layou_text.xml
1 2 3 4 5 6 7 8 9 10 11 12 <?xml version="1.0" encoding="utf-8"?> <LinearLayout xmlns:android ="http://schemas.android.com/apk/res/android" android:layout_width ="wrap_content" android:layout_height ="wrap_content" > <TextView android:layout_width="wrap_content" android:layout_height="wrap_content" android:text="Hello World!" /> </LinearLayout >
注意这里的android:layout_width和 android:layout_height 必须设置为wrap_content,否则下面的按钮将被覆盖
样式和主题
在color.xml自定义颜色
1 2 3 4 5 6 7 <?xml version="1.0" encoding="utf-8"?> <resources > <color name ="colorPrimary" > #0f0</color > <color name ="colorPrimaryDark" > #00f</color > <color name ="colorAccent" > #f00</color > </resources >
在res/valus/themes/themes.xml中自定义style
1 2 3 4 5 6 7 8 9 10 11 12 13 14 15 16 17 <resources xmlns:tools ="http://schemas.android.com/tools" > <style name ="Theme.StyleDemo" parent ="Theme.MaterialComponents.DayNight.DarkActionBar" > <item name ="colorPrimary" > @color/colorPrimary</item > <item name ="colorPrimaryDark" > @color/colorPrimaryDark</item > <item name ="colorAccent" > @color/colorAccent</item > </style > <style name ="myFont" parent ="TextAppearance.AppCompat.Medium" > <item name ="android:layout_width" > wrap_content</item > <item name ="android:layout_height" > wrap_content</item > <item name ="android:textSize" > 20dp</item > <item name ="android:textColor" > #0F0</item > </style > </resources >
在AndroidManifest.xml中指定使用哪个主题
1 2 <application android:theme="@style/Theme.StyleDemo">
在Activity中可以指定使用的控件
1 2 3 4 5 6 7 8 9 10 <?xml version="1.0" encoding="utf-8"?> <LinearLayout xmlns:android ="http://schemas.android.com/apk/res/android" android:layout_width ="wrap_content" android:layout_height ="wrap_content" > <TextView style="@style/myFont" android:text="Hello World!" /> </LinearLayout >
Style和Theme的相同点和不同点
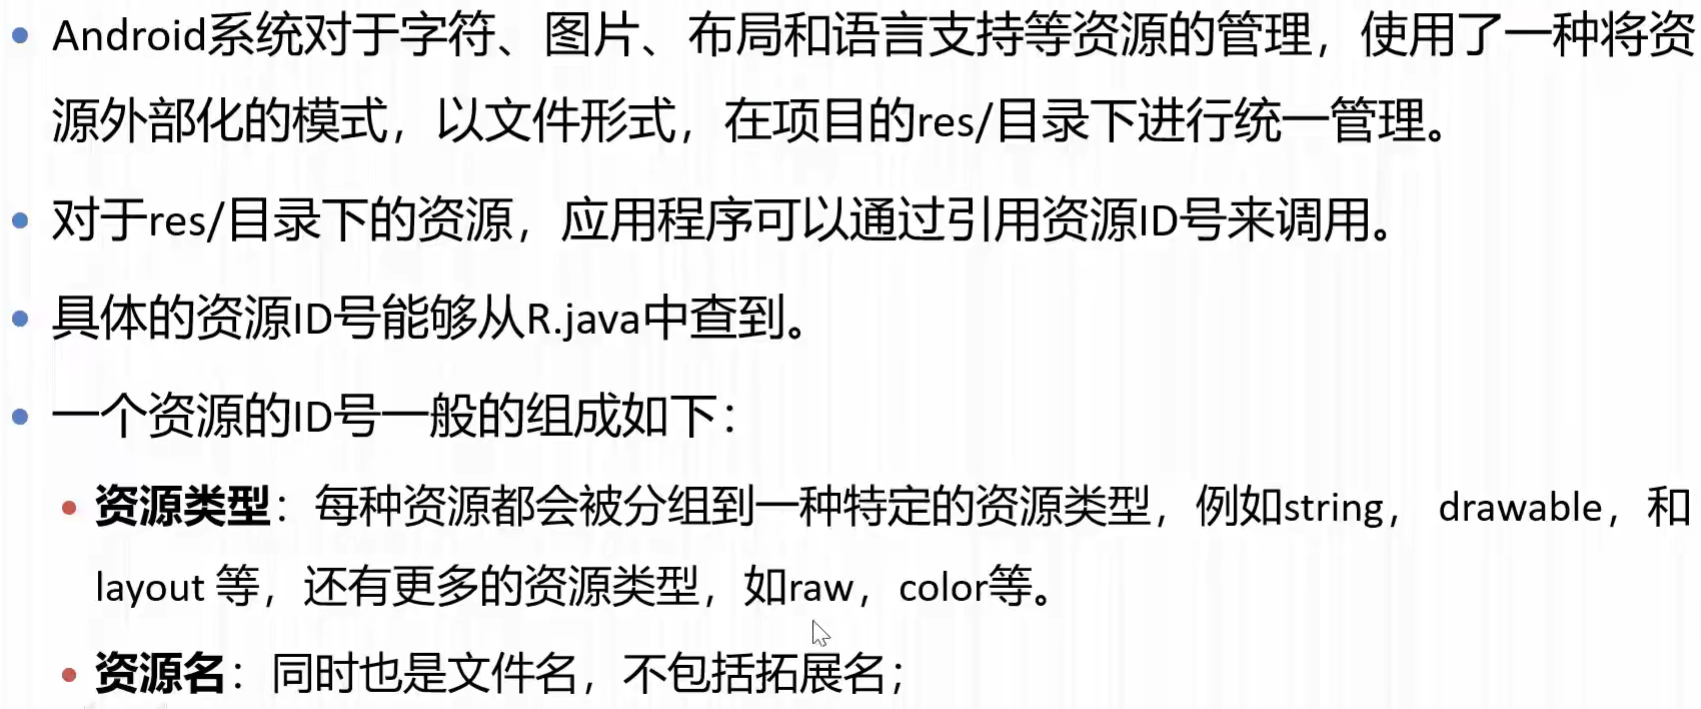
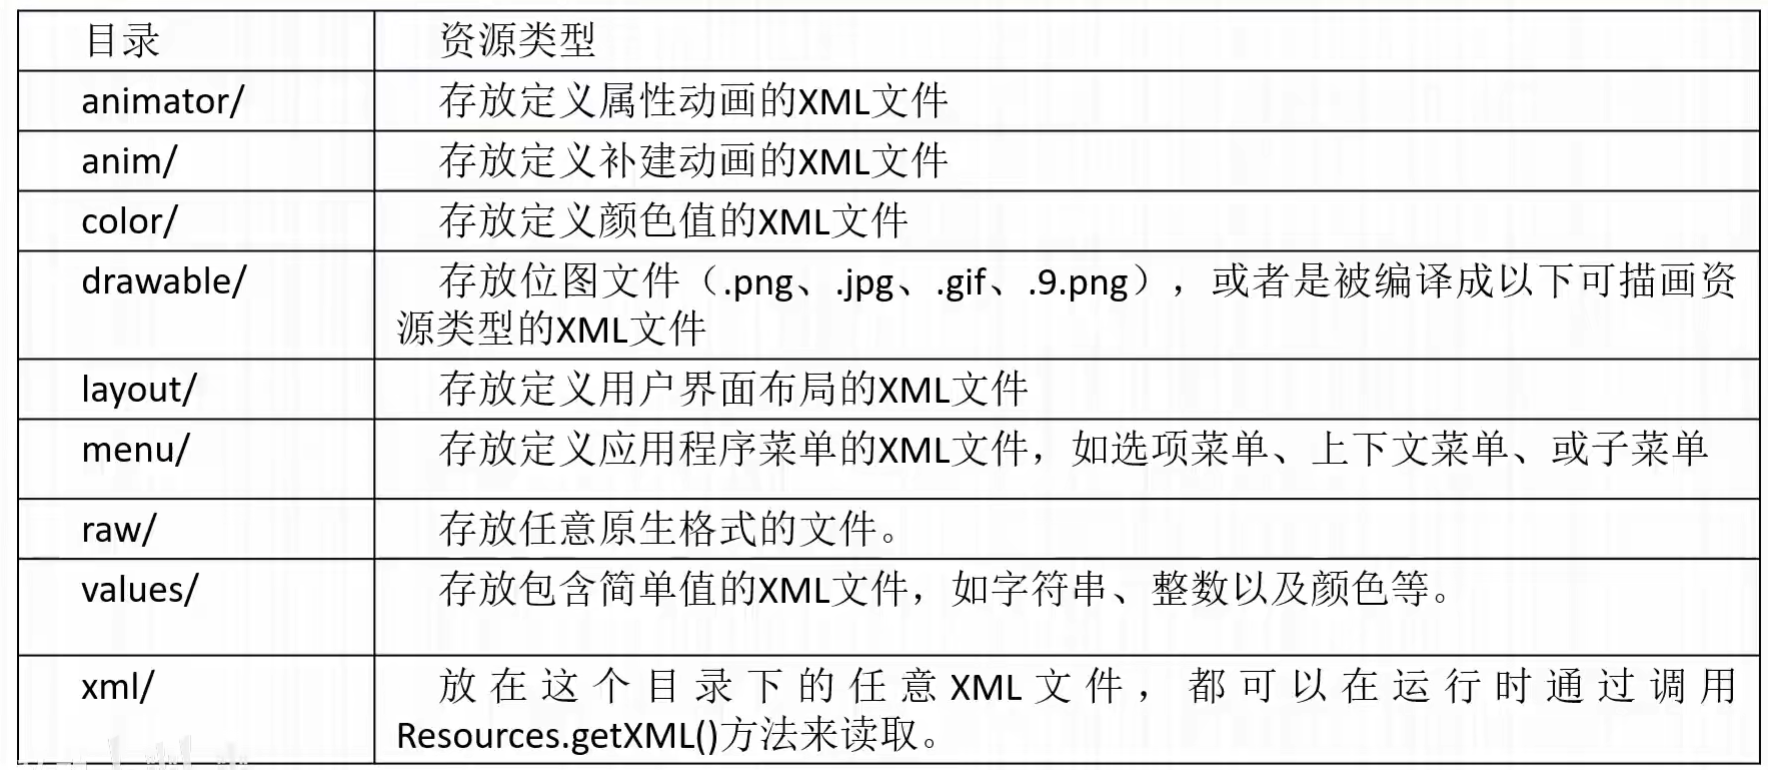
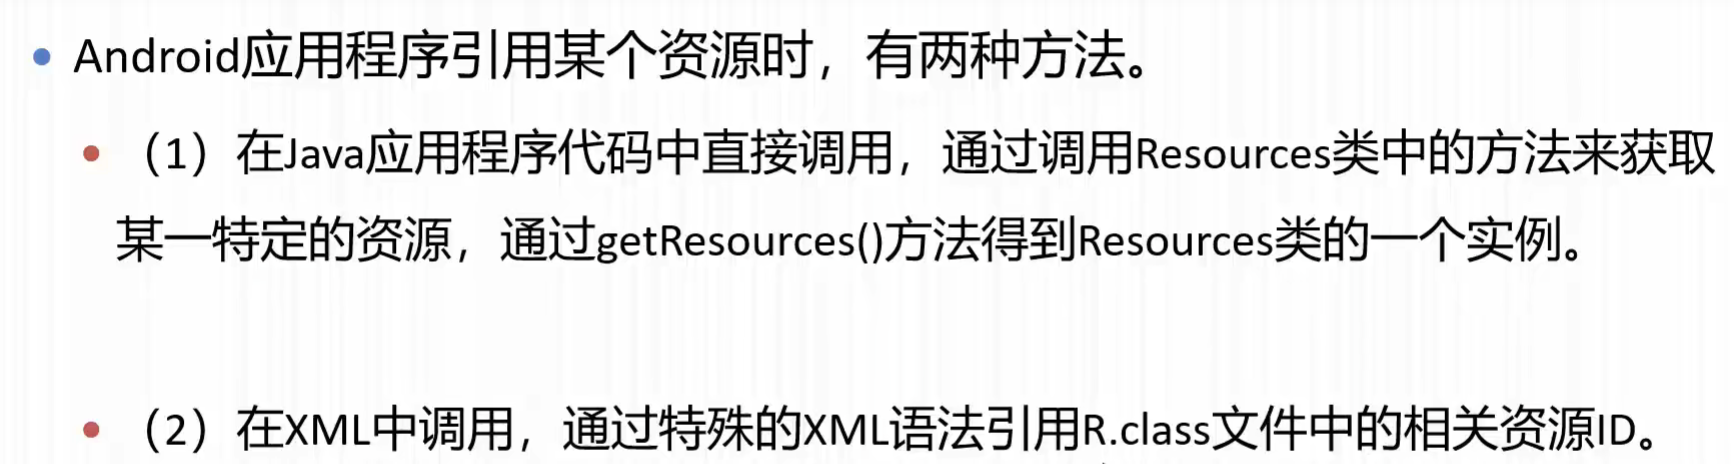
什么是资源
访问资源
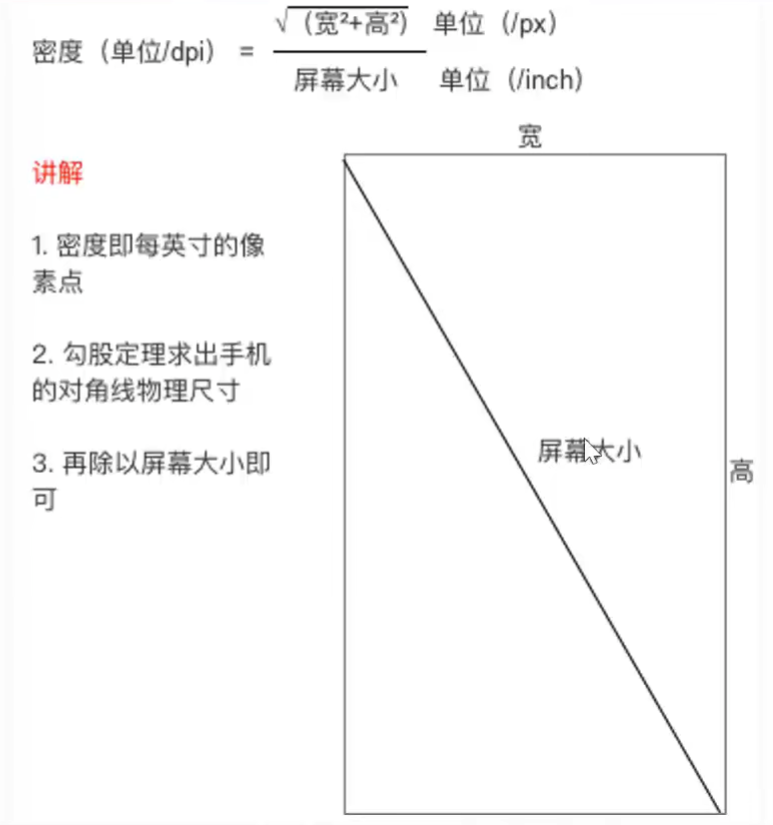
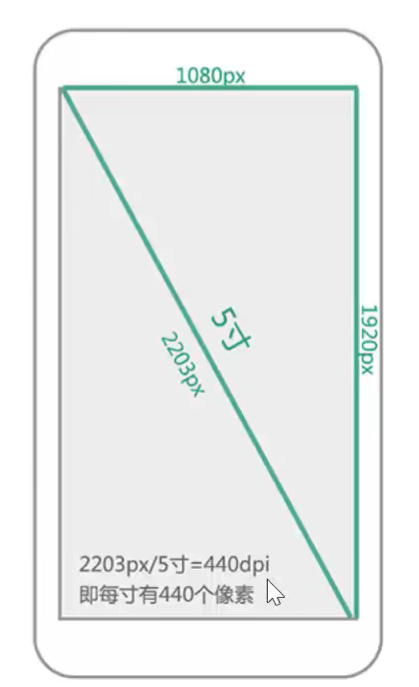
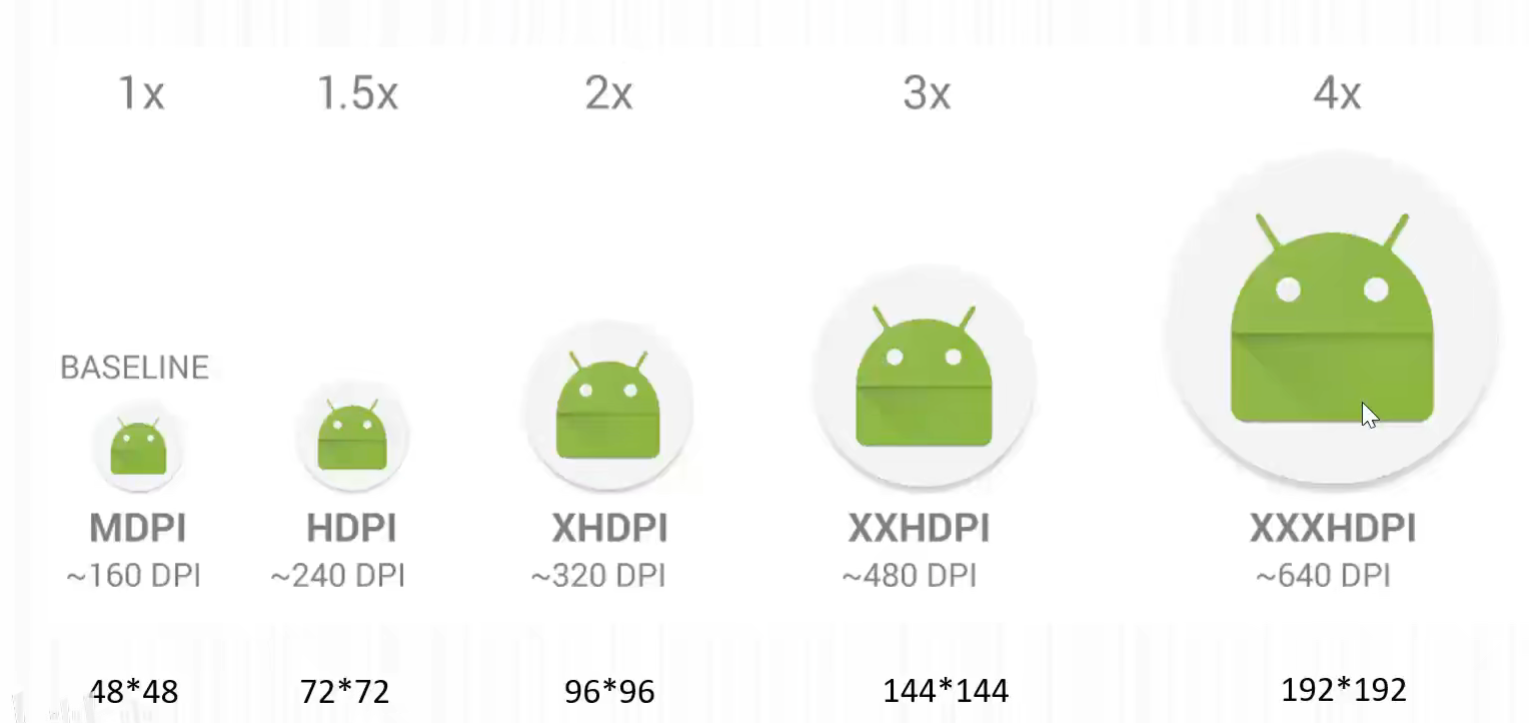
屏幕适配 屏幕尺寸、分辨率、像素密度三者关系
屏幕尺寸:指对角线的长度(以寸为单位)
分辨率:高 × 宽 (单位是像素点)
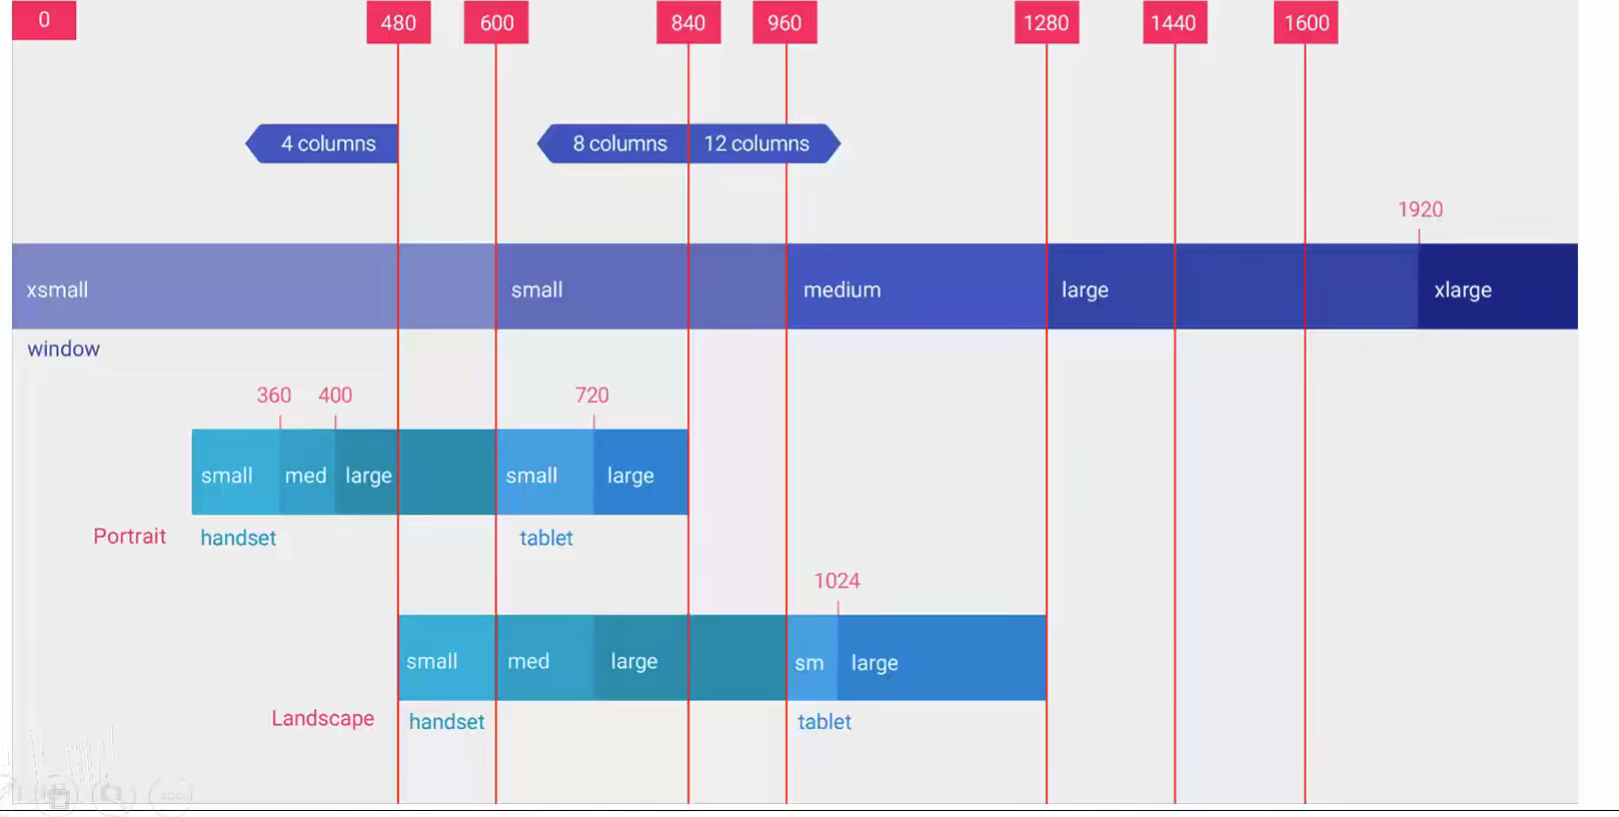
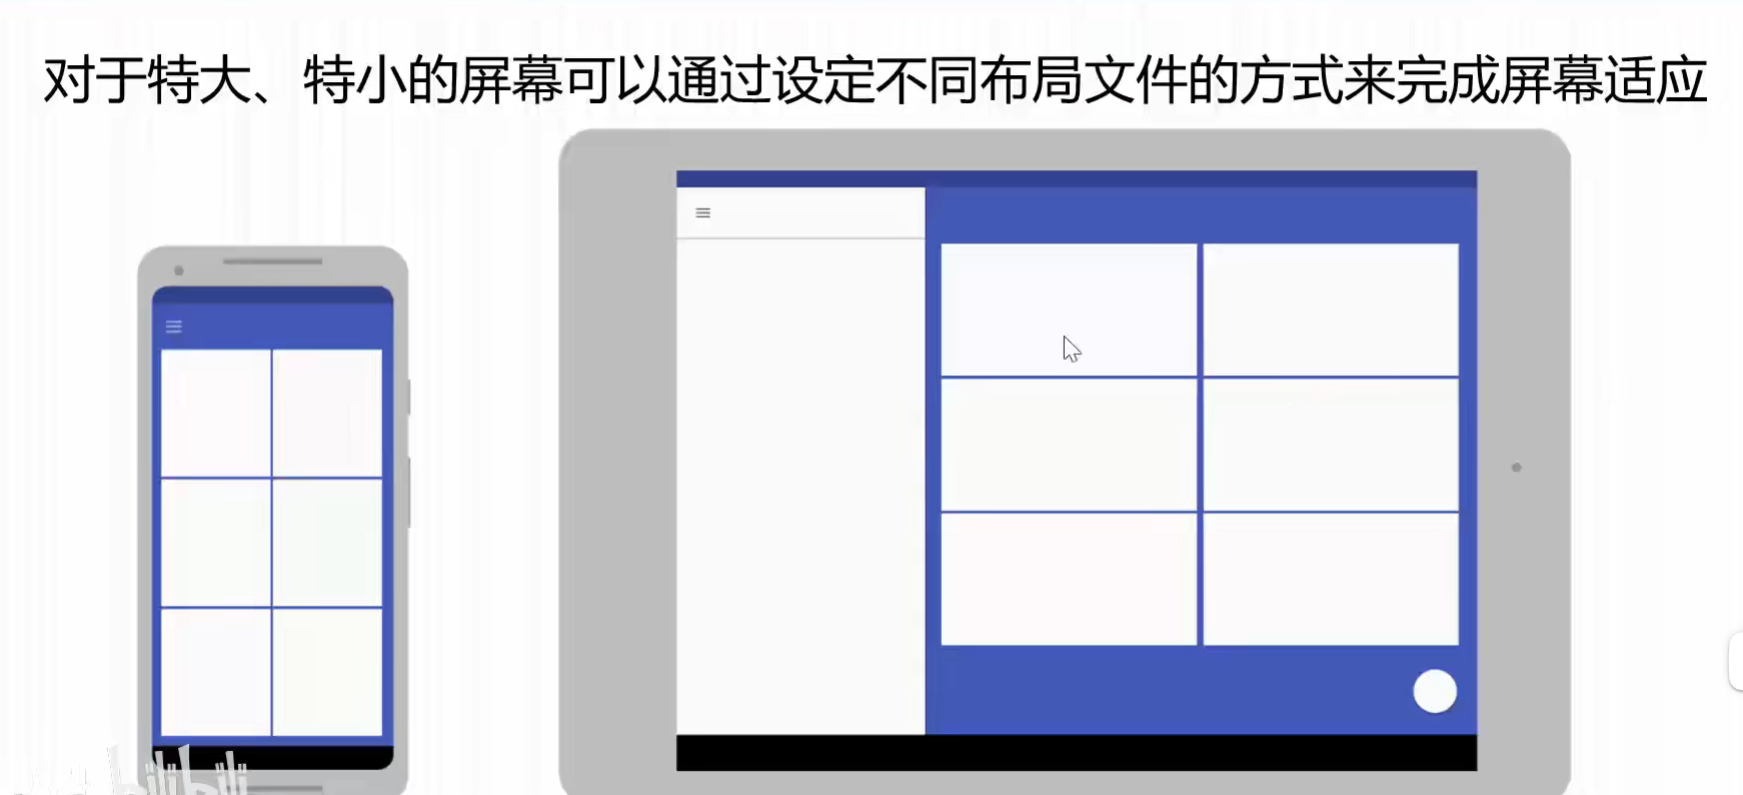
多屏幕适应 在用户程序用户界面设计中,可以从以下多个方面来设定对多种屏幕的支持
明确声明应用程序支持的所有屏幕尺寸
为不同的屏幕尺寸提供不同的布局
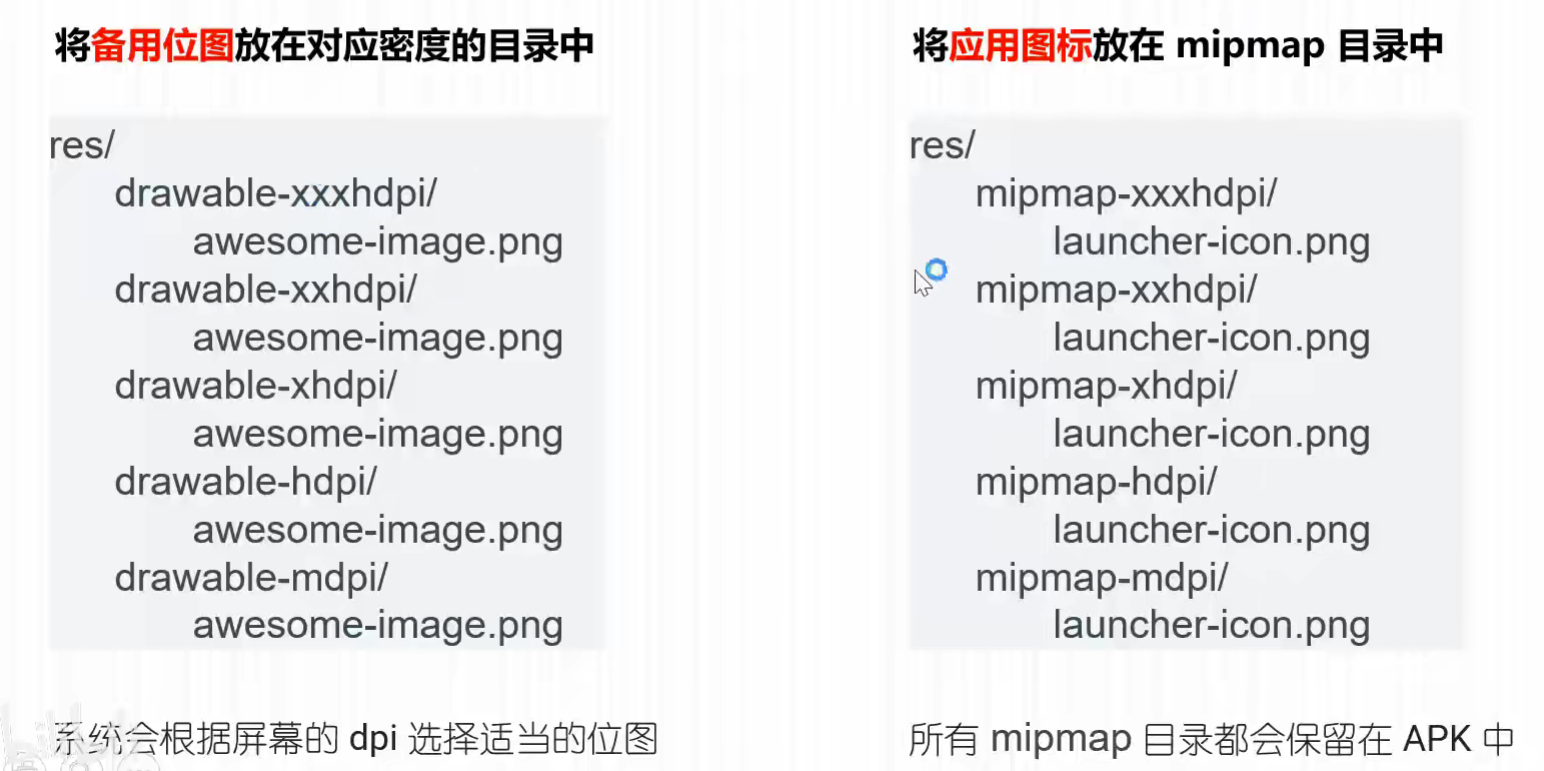
为不同的屏幕尺寸提供不同的位图
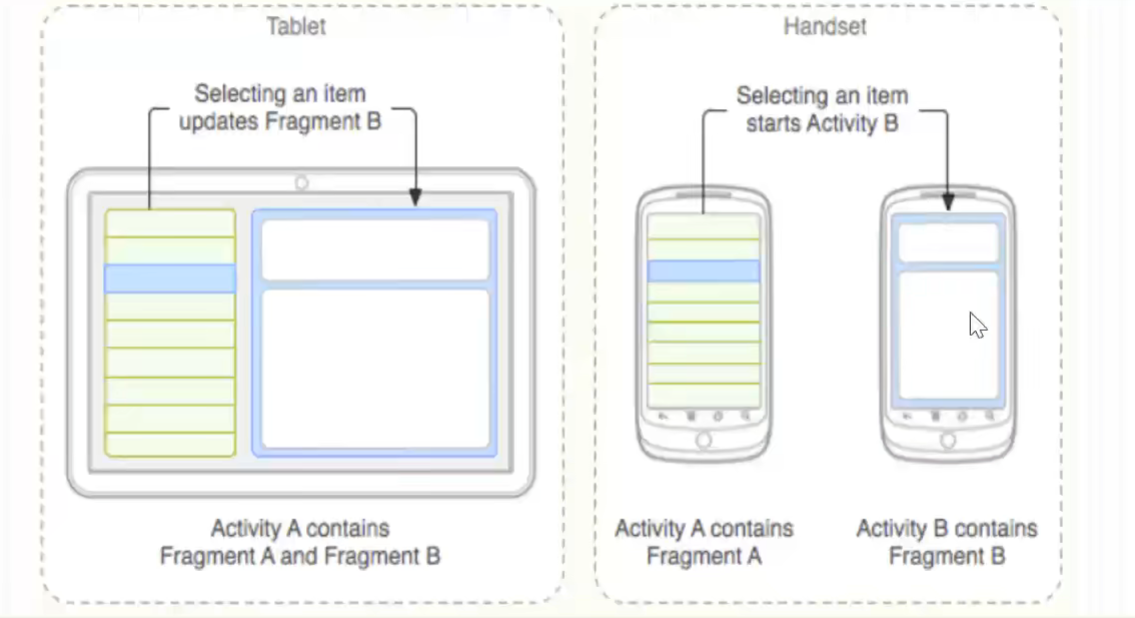
探究Fragment Fragment介绍
Fragment是 Android 3.0引入的。为大屏幕上更加动态和灵活的UI设计提供支持
一个Fragment可以看成是Activity的一个布局模块,可以容纳某种层次结构的View和ViewGroup对象
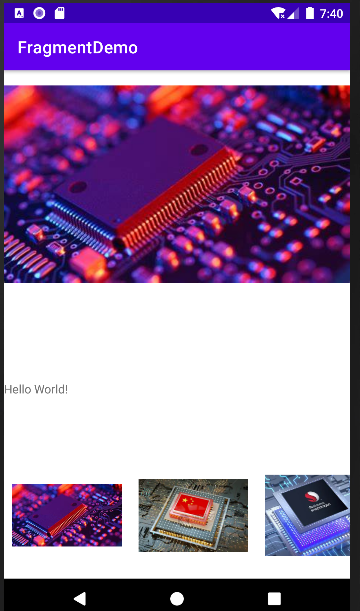
Fragment的简单用法 在activity_main.xml中 添加两个Fragment 1 2 3 4 5 6 7 8 9 10 11 12 13 14 15 16 17 18 19 20 21 22 <?xml version="1.0" encoding="utf-8"?> <LinearLayout xmlns:android ="http://schemas.android.com/apk/res/android" android:layout_width ="match_parent" android:layout_height ="match_parent" android:orientation ="vertical" > <fragment android:id="@+id/image_fragment" android:name="com.sineagle.fragmentdemo.ImageViewFragment" android:layout_height="wrap_content" android:layout_width="wrap_content" > </fragment > <fragment android:id="@+id/text_fragment" android:name="com.sineagle.fragmentdemo.TextViewFragment" android:layout_width="wrap_content" android:layout_height="wrap_content" ></fragment > </LinearLayout >
在layout目录下新建fragment_imageview.xml和fragment_textview.xml 1 2 3 4 5 6 7 8 9 10 11 12 13 14 <?xml version="1.0" encoding="utf-8"?> <LinearLayout xmlns:android ="http://schemas.android.com/apk/res/android" android:layout_width ="match_parent" android:layout_height ="match_parent" > <ImageView android:id="@+id/image_view" android:layout_width="wrap_content" android:layout_height="wrap_content" android:src="@drawable/xinpian1" android:layout_weight="3" ></ImageView > </LinearLayout >
1 2 3 4 5 6 7 8 9 10 11 12 13 <?xml version="1.0" encoding="utf-8"?> <LinearLayout xmlns:android ="http://schemas.android.com/apk/res/android" android:layout_width ="match_parent" android:layout_height ="match_parent" > <TextView android:id="@+id/text1" android:layout_width="wrap_content" android:layout_height="wrap_content" android:text="Hello World!" /> </LinearLayout >
新建对应的java文件 1 2 3 4 5 6 7 8 9 10 11 12 13 14 15 16 17 18 package com.sineagle.fragmentdemo;import android.os.Bundle;import android.view.LayoutInflater;import android.view.View;import android.view.ViewGroup;import androidx.annotation.NonNull;import androidx.annotation.Nullable;import androidx.fragment.app.Fragment;public class ImageViewFragment extends Fragment @Nullable @Override public View onCreateView (@NonNull LayoutInflater inflater, @Nullable ViewGroup container, @Nullable Bundle savedInstanceState) return inflater.inflate(R.layout.fragment_imageview, container, false ); } }
1 2 3 4 5 6 7 8 9 10 11 12 13 14 15 16 17 18 package com.sineagle.fragmentdemo;import android.os.Bundle;import android.view.LayoutInflater;import android.view.View;import android.view.ViewGroup;import androidx.annotation.NonNull;import androidx.annotation.Nullable;import androidx.fragment.app.Fragment;public class TextViewFragment extends Fragment @Nullable @Override public View onCreateView (@NonNull LayoutInflater inflater, @Nullable ViewGroup container, @Nullable Bundle savedInstanceState) return inflater.inflate(R.layout.fragment_textview, container, false ); } }
在activity_main.xml中的android:name显式声明类名 1 2 3 <fragment android:name="com.sineagle.fragmentdemo.ImageViewFragment"> </fragment >
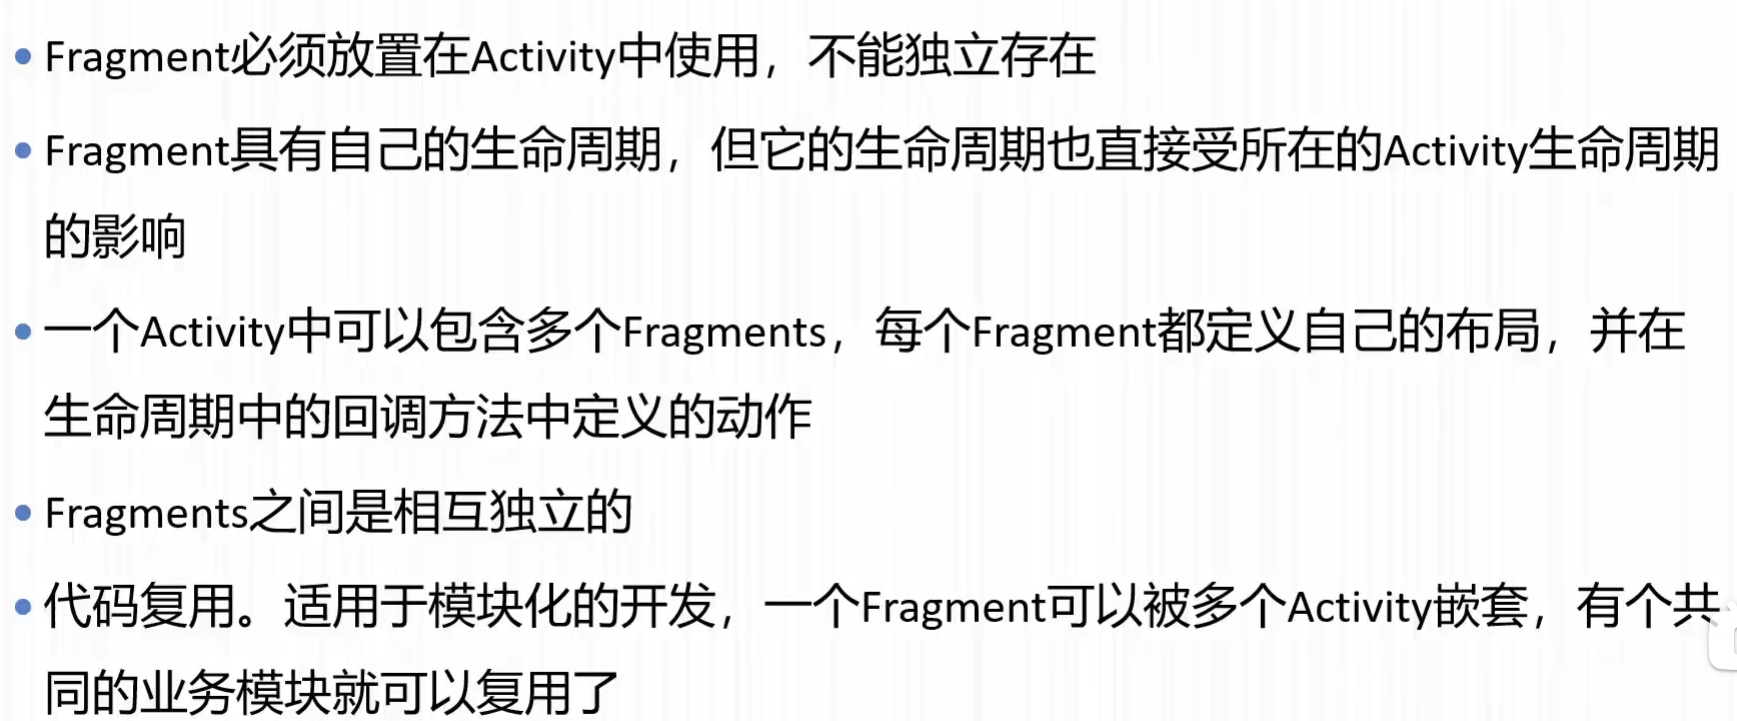
Fragment的特点
Fragment的生命周期 Fragment的状态 运行状态
当一个Fragment所关联的Activity正处于运行状态时,改Fragment也处于运行状态
暂停状态
当一个Activity进入暂停状态时(由于另一个未占满屏幕的Activity被添加到了栈顶),与它相关的Fragment就会进入暂停状态
停止状态
当一个Activity进入停止状态时,与它关联的Fragment就会进入停止状态,或者通过调用FragmentTransaction 的remove()、replace()方法将Fragment从Activity中移除,但在事务提交前调用了addToBackStack()方法,这时的Fragment也会进入停止状态。总的来说,进入停止状态的Fragment对用户来说是完全不可见的,由可能被系统回收。
销毁状态
Fragment总是依附于Activity而存在,因此当Activity被销毁时,与它相关联的Fragment就会进入销毁状态。或者通过调用FragmentTransaction的remove()、replace()方法将Fragment从Activity中移除,但在事务体提交之前没有调用addToBackStack()方法,这时的Fragment也会进入销毁状态
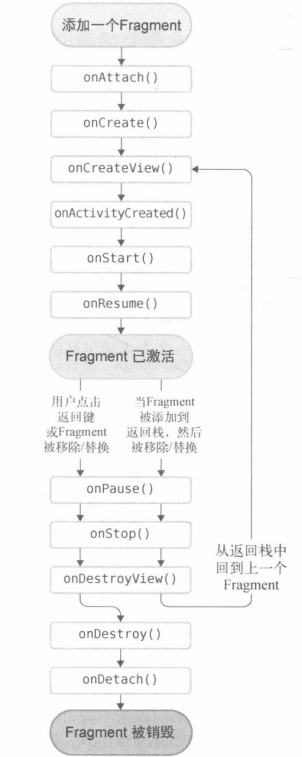
Fragment的回调函数
onAttach() : 当Fragment和Activity建立关联时启动onCreate() : 创建Fragment对象时调用onCreateView() : 为Fragment创建视图(加载布局)时调用onActivityCreated() : 确保与Fragment相关联的Activity已经创建完毕时调用onDestoryView() : 当与Fragment关联的视图被移除时调用。onDetach() : 当Fragment和Activity解除关联时调用
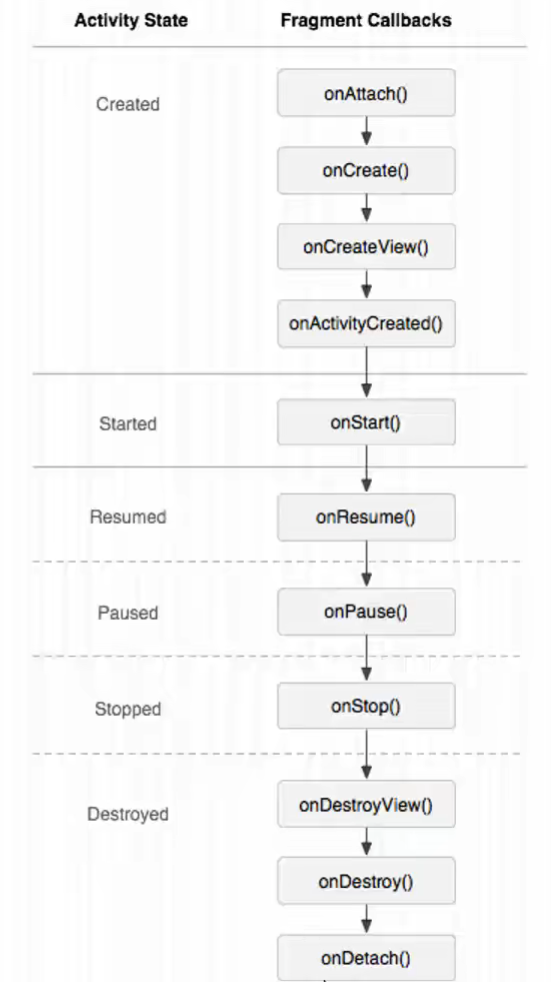
Activity生命周期对Fragment生命周期的影响
Activity的生命周期,直接影响Fragment的生命周期。
在Activity状态转换时,生命周期中每一个回调方法的调用,都导致其中的Fragment对应的回调方法的调用
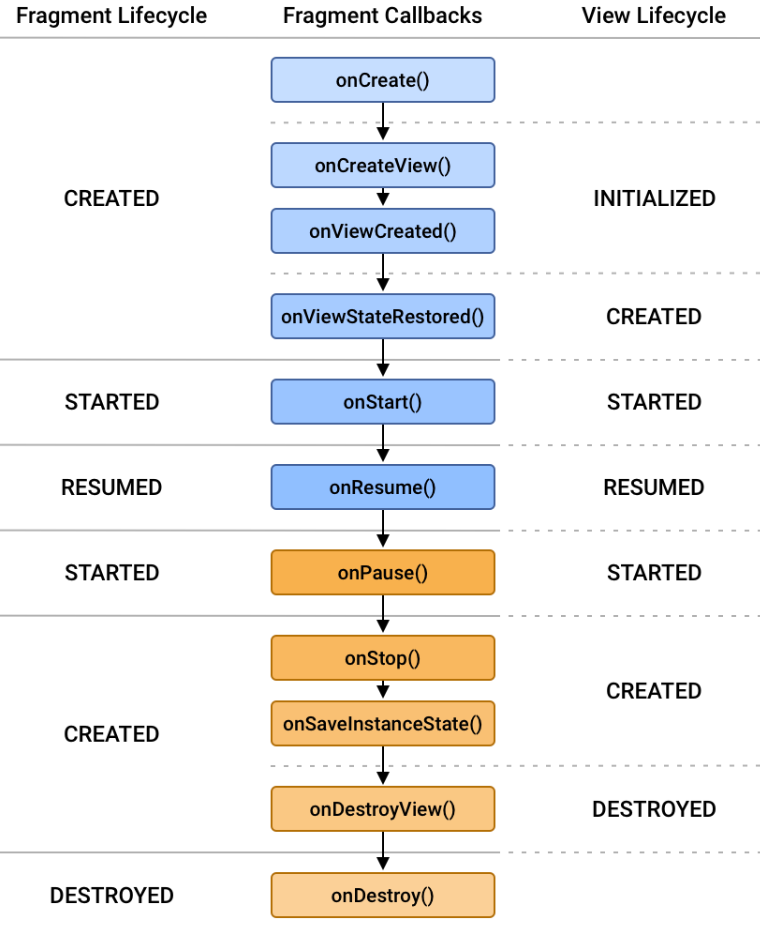
如今onActivityCreated已经被弃用
事件处理 Android的事件处理机制有两种
基于回调
在XML定义按钮的事件类型及其事件处理方法,在Java中完成事件处理方法的定义
基于监听接口
实现onClickListener监听接口,当单击按钮时,通过OnClickListener监听接口触发onClick()事件
基于回调的事件处理机制 在Android平台中,每个View都有自己处理事件的回调方法,通过重写View中的回调方法来实现响应事件。当某个事件没有被任何一个View处理时,便会调用Activity中相应的回调方法。
通过OnClickListener接口实现事件响应
1 2 3 4 5 6 7 8 9 10 11 12 13 14 15 16 17 18 19 20 21 public class EventActivity extends AppCompatActivity @Override protected void onCreate (Bundle savedInstanceState) super .onCreate(savedInstanceState); setContentView(R.layout.activity_event); Button btn = findViewById(R.id.btn); btn.setOnClickListener(new myOnclickListener()); } public class myOnclickListener implements View .OnClickListener @Override public void onClick (View view) TextView tv = findViewById(R.id.text_view); tv.setText(R.string.newStr); EventActivity.this .setTitle("新标题" ); } } }
通过匿名内部类来实现
1 2 3 4 5 6 7 8 9 10 11 12 13 14 15 @Override protected void onCreate (Bundle savedInstanceState) super .onCreate(savedInstanceState); setContentView(R.layout.activity_event); Button btn = findViewById(R.id.btn); btn.setOnClickListener(new View.OnClickListener() { @Override public void onClick (View view) TextView tv = findViewById(R.id.text_view); tv.setText(R.string.newStr); EventActivity.this .setTitle("新标题" ); } }); }
Fragment的动态调用 Fragment有两种设置方法
静态调用
在配置文件(xml)中描述fragment的装载关系
动态调用
在控制文件(java)中描述fragment的装载关系
静态调用 :
定义两个布局文件fragment1.xml, fragment2.xml
定义对应的fragment1.java, fragment2.java
定义一个全局配置文件,装配两个 fragment 在manifest文件中注册Activity
动态调用
动态UI, 是在Activity运行时能够根据屏幕的状态自动添加、删除、替换组成的用户界面的Fragment或Fragment中的组件,能够自动重新组织Fragment的布局,给用户一个自适应的操作显示界面
Android系统使用FragmentManager创建一个FragmentTrasaction来完成Fragment的事务处理
在activity_main.xml中添加如下代码
1 2 3 4 5 6 <LinearLayout android:id="@+id/listFragment" android:layout_width="wrap_content" android:layout_height="wrap_content" android:orientation="horizontal" ></LinearLayout >
新建fragment_listview.xml
1 2 3 4 5 6 7 8 9 10 11 12 13 14 15 16 17 18 19 20 21 22 23 24 25 26 27 28 29 30 31 32 33 34 35 36 37 <?xml version="1.0" encoding="utf-8"?> <LinearLayout xmlns:android ="http://schemas.android.com/apk/res/android" android:layout_width ="match_parent" android:layout_height ="match_parent" android:orientation ="horizontal" > <ImageView android:id="@+id/image1" android:layout_height="150dp" android:layout_width="150dp" android:src="@drawable/xinpian1" android:padding="10dp" ></ImageView > <ImageView android:id="@+id/image2" android:layout_height="150dp" android:layout_width="150dp" android:src="@drawable/xinpian2" android:padding="10dp" ></ImageView > <ImageView android:id="@+id/image3" android:layout_height="150dp" android:layout_width="150dp" android:src="@drawable/xinpian1" android:padding="10dp" ></ImageView > <ImageView android:id="@+id/image4" android:layout_height="150dp" android:layout_width="150dp" android:src="@drawable/xinpian2" android:padding="10dp" ></ImageView > </LinearLayout >
新建ListViewFragment.java
1 2 3 4 5 6 7 8 9 10 11 12 13 14 15 16 17 18 19 package com.sineagle.fragmentdemo;import android.os.Bundle;import android.view.LayoutInflater;import android.view.View;import android.view.ViewGroup;import androidx.annotation.NonNull;import androidx.annotation.Nullable;import androidx.fragment.app.Fragment;public class ListViewFragment extends Fragment @Nullable @Override public View onCreateView (@NonNull LayoutInflater inflater, @Nullable ViewGroup container, @Nullable Bundle savedInstanceState) return inflater.inflate(R.layout.fragment_listview, container, false ); } }
在MainActivity.java修改如下
1 2 3 4 5 6 7 8 9 10 11 12 13 14 15 16 17 18 19 package com.sineagle.fragmentdemo;import androidx.appcompat.app.AppCompatActivity;import androidx.fragment.app.FragmentManager;import android.os.Bundle;public class MainActivity extends AppCompatActivity @Override protected void onCreate (Bundle savedInstanceState) super .onCreate(savedInstanceState); setContentView(R.layout.activity_main); FragmentManager fm = getSupportFragmentManager(); fm.beginTransaction().add(R.id.listFragment, new ListViewFragment()).commitNow(); } }
这时候如果切换为竖屏,就会报错,原因是重新调用onCreate()导致产生了两个ListViewFragment,因此我们需要在onCreate()中加如判断进行移除
1 2 3 4 5 6 7 8 9 10 11 12 13 14 15 16 17 18 19 20 21 22 23 24 @Override protected void onCreate (Bundle savedInstanceState) super .onCreate(savedInstanceState); setContentView(R.layout.activity_main); DisplayMetrics dm = new DisplayMetrics(); getWindowManager().getDefaultDisplay().getMetrics(dm); int screenWidth = dm.widthPixels; int screenHeight = dm.heightPixels; FragmentManager fm = getSupportFragmentManager(); Fragment frag = fm.findFragmentById(R.id.listFragment); if (screenWidth > screenHeight) { if (frag != null ) { fm.beginTransaction().remove(frag).commitNow(); } } else { if (frag == null ) { fm.beginTransaction().add(R.id.listFragment, new ListViewFragment()).commitNow(); } } }
创建动态UI步骤
创建Activity和Fragment子类
定义需静态或动态添加的Fragment布局
根据添加Fragment和Fragment事务的策略,定义Activity布局
动态添加、删除或替换Fragment
动态Fragment的事件处理
在Mainifest文件中声明Activity
动态Fragment事件处理 方法一:在activity中获取两个Fragment的控件,进行控制 在MainActivity.java中添加onStart()方法
1 2 3 4 5 6 7 8 9 10 11 12 13 14 15 16 17 18 @Override protected void onStart () super .onStart(); ImageView img_fra = findViewById(R.id.image_view); for (int i = 0 ; i < img.length; i ++) { ImageView iv = (ImageView) findViewById(img[i]); if (iv != null ) { iv.setOnClickListener(new View.OnClickListener() { @Override public void onClick (View view) ImageView view1 = (ImageView)view; img_fra.setImageDrawable(view1.getDrawable()); } }); } } }
方法二:在一个Fragment中获取另一个Fragment的控件,进行控制 在ListViewFragment.java中添加onActivityCreated()方法
1 2 3 4 5 6 7 8 9 10 11 12 13 14 15 16 17 @Override public void onActivityCreated (@Nullable Bundle savedInstanceState) super .onActivityCreated(savedInstanceState); final ImageView img_fra = this .getActivity().findViewById(R.id.image_view); for (int i = 0 ; i < img.length; i ++) { ImageView iv = (ImageView) this .getActivity().findViewById(img[i]); if (iv != null ) { iv.setOnClickListener(new View.OnClickListener() { @Override public void onClick (View view) ImageView view1 = (ImageView)view; img_fra.setImageDrawable(view1.getDrawable()); } }); } } }
Fragment的通信 Fragment和Activity的通信
Fragment中定义接口并定义设置接口的方法
Activity实现接口
Fragment添加监听,事件处理环节调用事件处理接口,具体操作由Activity进行
Activity的onAttach方法中,调用Fragment设置接口的方法,将自身引用传入
1.在Fragment中定义接口并定义设置接口的方法 1 2 3 4 5 6 7 8 9 ListViewEvent listViewEvent; public interface ListViewEvent public void onImageClickListener (ImageView view) } public void setListViewEvent (ListViewEvent listViewEvent) this .listViewEvent = listViewEvent; }
2. 在Activity中实现接口 1 2 3 4 5 6 7 8 9 10 11 12 13 14 15 16 17 18 19 20 public class MainActivity extends AppCompatActivity implements ListViewFragment .ListViewEvent private int img[] = {R.id.image1, R.id.image2, R.id.image3, R.id.image4, R.id.image5, R.id.image6}; ImageView img_fra; @Override protected void onCreate (Bundle savedInstanceState) ... } @Override protected void onStart () super .onStart(); img_fra = findViewById(R.id.image_view); .... } @Override public void onImageClickListener (ImageView view) img_fra.setImageDrawable(view.getDrawable()); } }
3.Fragment实现事件监听,事件处理环节调用事件处理接口,具体操作由Activity进行 1 2 3 4 5 6 7 8 9 10 11 12 13 14 @Override public void onActivityCreated (@Nullable Bundle savedInstanceState) super .onActivityCreated(savedInstanceState); for (int i = 0 ; i < img.length; i ++) { ImageView iv = (ImageView) this .getActivity().findViewById(img[i]); iv.setOnClickListener(new View.OnClickListener() { @Override public void onClick (View view) listViewEvent.onImageClickListener((ImageView) view); } }); } }
4. Activity的onAttachFragment方法中,调用Fragment设置接口的方法,将自身引用传入 1 2 3 4 5 6 7 8 @Override public void onAttachFragment (Fragment fragment) super .onAttachFragment(fragment); if (fragment instanceof ListViewFragment) { ListViewFragment lvf = (ListViewFragment) fragment; lvf.setListViewEvent(this ); } }